
Before you install the MMR software, you’ll need to install Network adapters in the computer that you’ve chosen to use for the MMR. You’ll need one adapter for each type of network that you want the MMR to handle. This is in addition to the adapter that you use for your Internet connection. Follow the Manufacturer’s setup procedure for each adapter, but keep the following things in mind:
Check your IRQs
Make sure you have IRQs available (for the ISA cards) or have IRQ sharing (for the PCI-based) cards, before you physically install the cards. (See this page if you need help doing this.)Uninstall any existing Internet Sharing software before you install the new adapters.
This is very important. The NAT part of the MMR will take care of Internet sharing and you don’t want your old sharing method to collide with the MMR.Don’t let the installer install Internet Sharing
Some of the early wireless and phoneline products didn’t give you an option, but most of the new products do.Delete unneeded Protocols
TCP/IP is really the only protocol that you need for both Internet access and File and Printer sharing. So after your card’s installer finishes, open the Network Control panel and delete NetBeui and IPX/SPX if they are installed. You can also delete any VPN related protocols or Adapters, unless you know that you need them. Finally, don’t delete any special protocols that your adapter may need. (The Proxim Symphony installs two special protocols, for example.)
If the installer doesn’t install TCP/IP, you’ll have to do it manually. (You can popup some quick instructions if you need help.) After you install TCP/IP, you’ll need to configure it. Follow the instructions below to configure TCP/IP for each of the MMR computer network adapters.
To be compatible with Soft Router Plus (which you’ll be installing shortly), use IP address 192.168.1.1 for one of the network adapters, 192.168.2.1 for the next, and 192.168.3.1 if you have a third network adapter. In this example network, the Ethernet LAN uses the 192.168.1.X range and the Wireless LAN uses 192.168.2.X.
Settings for the network adapters in the MMR Computer |
IP address: set as instructed above
Subnet Mask: 255.255.255.0
WINS Configuration: Disable WINS resolution
Gateway: set to 192.168.1.254, 192.168.2.254, or 192.168.3.254 to match the IP address you enter
DNS Configuration:
DNS settings apply to all NICs in a given computer, so you can’t set them differently for the each NIC.
If your ISP has assigned you a static IP address, this will probably be enabled and other information will be filled in when the network adapter that connects you to the Internet was set up.
If your ISP uses DHCP to assign you an IP address, open one of the TCP/IP copies for any of your network adapters,
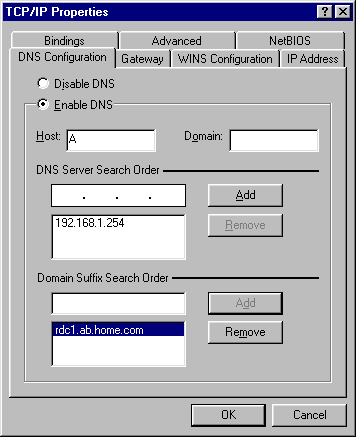
click on Enable DNS, enter your computer name in the Host box, set the DNS Server Search Order box to 192.168.1.254. If you’re an @Home user, you might as well enter your domain name in the Domain Suffix Search Order box while you’re at it, since you’ll probably have problems unless you do! The example below shows a completed DNS Configuration tab.
NOTE: The Domain Suffix Search Order entry shown below is an example. Enter your Domain name. If you don’t know what it is, try the procedure on this page.
Bindings: Check Client for Microsoft Networks and File and Printer Sharing for Microsoft Networks
Advanced: make sure the “Set this protocol to be the default protocol.” is checked.
- NetBios: no changes.
Don’t forget the Clients! |
After you get the adapters installed on the MMR computer, you should install a matching adapter on one of each type of Client machine. Set the TCP/IP properties as follows::
IP address: set to
192.168.1.2 through 192.168.1.253 or
192.168.2.2 through 192.168.2.253 or
192.168.3.2 through 192.168.3.253
to match the network that you are on.
Each computer needs to have a different IP address.Subnet Mask: 255.255.255.0
WINS Configuration: Disable WINS resolution
Gateway: set to 192.168.1.254, 192.168.2.254, or 192.168.3.254 to match the IP address you enter.
DNS Configuration: set the DNS Server Search Order box to 192.168.1.254, 192.168.2.254, or 192.168.3.254 to match the IP address you entered. If you’re an @Home user, enter your domain name in the Domain Suffix Search Order box as you did in the MMR adapter TCP/IP settings
Bindings: Check Client for Microsoft Networks and File and Printer Sharing for Microsoft Networks
Advanced: make sure the “Set this protocol to be the default protocol.” is checked.
- NetBios: no changes.
That should be it for TCP/IP installation.


