
by Aaron Weiss
In Part 1 of “Creating a Wireless Network” we considered which equipment you’d need to meet your goals for speed, range, and security. Gear in hand, let’s set up the hardware and walk through a few simple configuration steps to bring your wireless network to life.
For the purpose of this guide, let’s assume you have two pieces of wireless gear: a wireless broadband router and a portable computer with wireless capability. If your portable computer does not have built-in wireless, you may use either a wireless card or USB adapter as described in Part 1. In either case, follow the manufacturer’s instructions for installing the device drivers that came with the hardware.
Step 1: Get To Know Your Wireless Router
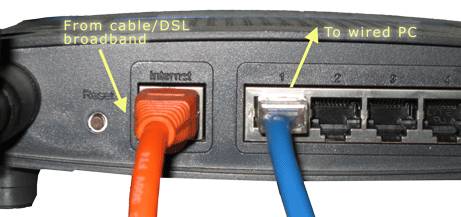
On the rear of a typical wireless router you’ll see several connections (from right to left in Figure 1):

- A power input jack one.
- One or more wired Ethernet jacks (often labeled 1, 2, 3, 4) for computers on your network which don’t have wireless ability.
- One Ethernet jack for your broadband connection, often labeled “WAN” or “Internet.”
- A reset button. On most routers you can depress this button for 30+ seconds to restore all configuration settings to their factory defaults.
Depending on the model, some wireless routers will also have a small switch on the back to physically enable or disable the wireless network. You should verify that this switch is set to “on” to use the wireless functionality.
Some costlier routers may also feature two Ethernet inputs for two incoming broadband connections, for users who have both cable and DSL, for example.
Step 2: Determine Your Broadband Type
If you are not connecting your wireless router to a broadband connection, and only intend to use wireless networking for your local network rather than connecting to the Internet, skip this section.
Most people will connect their wireless router to an incoming broadband service. You need to know how your broadband service lets you onto its network, information we’ll use in Step 5 to configure your router. There are three common broadband connection methods:
- DHCP aka Dynamic IP : The most common type of broadband connection, especially for cable modem users. Basic network parameters are automatically assigned to your router by the broadband modem.
- PPPoE: An increasingly common connection type, especially for DSL users in some parts of the country. PPPoE requires you to supply a username and password to initiate your broadband connection, information which should have been provided to you when your broadband service was installed or puchased.
- Static IP: Less common for home residential users, somewhat more common for business broadband. Your broadband provider would have supplied you with a set of numeric addresses you need to connect to the network, as they are not assigned automatically.
If you don’t know which of the above your broadband service uses, when we setup your router you can try DHCP, since it is fully automatic. Should that fail to connect, you may contact your broadband provider for details.
Step 3: Connect Your Router To a Wired PC For Initial Setup
Before you place the router in its ideal location, we will first set things up with a temporary wired connection to a computer. Either a desktop PC or portable computer with an Ethernet jack will do, although hooking up to a portable may require less climbing behind or under furniture.
3A. Your router probably included an Ethernet cable in the box. Use this or another Ethernet cable you have to connect the network jack on your computer to one of the local ports on the router – those labeled 1, 2, and so on. It doesn’t matter which, as long as you do not connect the cable to your router’s “WAN”/”Internet” port.
Also connect the Ethernet cable from your broadband modem to the “WAN”/”Internet” port on your router.
Now your router is connected via cable to both your broadband modem and your computer.
3B. It often helps to reboot your broadband modem at this point — the easiest way is to unplug it from power and plug it back in. Most broadband modems will take a little while to reboot, anywhere from a few seconds to a couple of minutes.
Boot (or reboot) your computer as well.
Step 4: Open Web Browser and Connect to Wireless Router Administration Interface
You manage and configure your wireless router using a Web browser. To connect to your router you need to know its default IP address and connect your browser to http://routeripaddress. For example, if you own a Linksys brand wireless router, its default IP address is 192.168.1.1, and therefore you open your browser to the URL http://192.168.1.1.
Most wireless routers also require you to log in to access configuration pages. Quite likely, your router includes a manual or a “quick setup” guide which details both its default IP address and default login. Some common IP addresses and logins for popular brands include:
| Brand | Default Address | Default Username | Default Password |
| Belkin | 192.168.2.1 | <none> | <none> |
| D-Link | 192.168.0.1 | admin | <none> |
| Linksys | 192.168.1.1 | <none> or admin | admin or <none> |
| Netgear | 192.168.0.1 | admin | password |
| SMC | 192.168.2.1 | <none> | smcadmin |
| Zyxel | 192.168.1.1 | admin or <none> | 1234 |
Note that <none> means to leave the field blank. These defaults describe many models in a vendor’s lineup, but may not be accurate for certain exceptions or new models released after publication. Again, the documentation included with your router should clearly describe its default IP address and login.
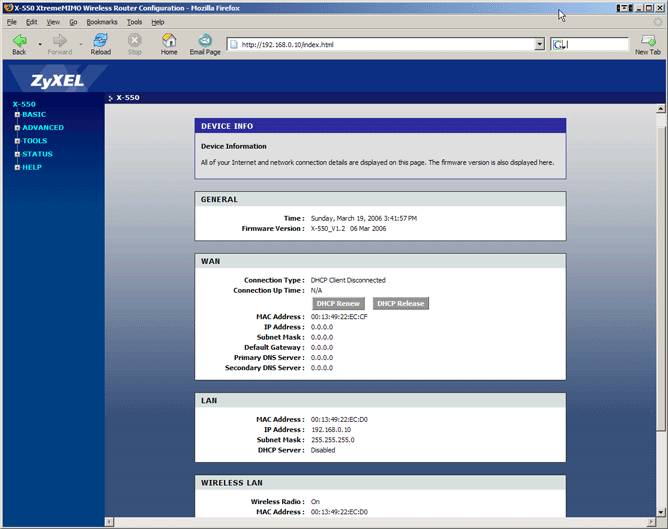
Once connected, you’ll see an administration interface similar to that in Figure 3, which was taken from a Zyxel brand wireless router. Your particular router’s interface may look different and feature different menus, but many of the most important settings are similar between models and brands. Consult your documentation, of course.
Step 5: Configure Your Broadband Connection
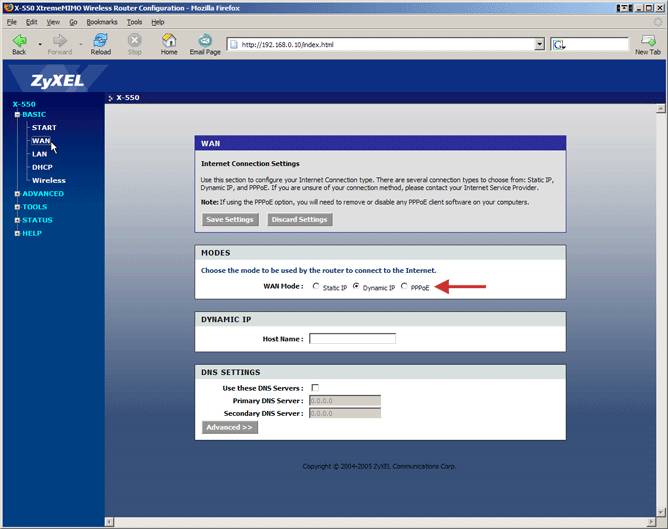
You may recall way back in Step 2 you determined the type of broadband connection you have. Now it’s time to setup the router accordingly. On this model, we clicked the “Basic” menu and “WAN” submenu. Again, your model may differ, and newer models may include a guided wizard that takes you through these steps. Users without a broadband connection can likewise skip this step.
In our case, we have a broadband connection of the DHCP variety, also known as “Dynamic IP” as you see in Figure 4.
PPPoE users should click that button and a prompt will request your login name and password, as supplied by your service provider.
Static IP users will be prompted to supply several numerical addresses, also supplied by your service provider.
It’s important to click “Save Settings” (sometimes called “Apply Settings”) whenever you make a change.
Test that your router is successfully connected to your broadband. One quick way is to simply open a page to a Web site, such running a search at Google.
If you cannot access the Web, the most common cause is choosing the wrong broadband connection type for your service.
Step 6: Configure Your Wireless Network Basics
If your router is connected to broadband and it’s working successfully, we can (finally!) setup the wireless networking configuration. On our sample router we clicked the “Wireless” submenu.
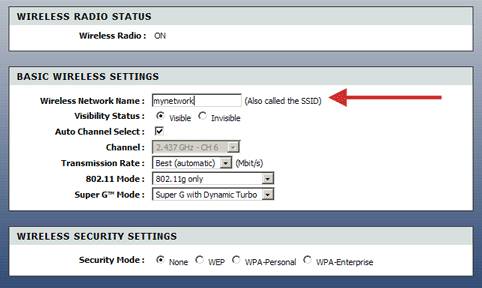
It sounds simple, but note that the router reports that the wireless radio is on. Without that we would get nowhere. This particular router has a physical switch on the back to enable the wireless function. Other routers will include a checkbox in this administration interface for enabling or disabling all wireless function. Some wireless routers come out-of-the-box with their wireless disabled, others enabled. So it’s important to double check.
Assign your wireless network a name, also known as an SSID. Choose a unique name in case there may be neighboring wireless routers nearby.
The visibility status setting is sometimes known on other routers as “hidden” mode. Some people mistakenly believe that hiding your network name is an effective form of security. It is not. You don’t need to hide your network name.
Also note the 802.11 mode setting, typically found on “g” variety wireless routers. Here you can tell the wireless router to connect only to devices which support the faster “g” mode, only the slower “b” mode, or either kind of device. Supporting both modes will make your wireless network more compatible with a variety of users. But if you know that you have only “g” wireless hardware in your network, selecting g-only mode can improve overall wireless performance.
Step 7: Configure Your Wireless Security
In most circumstances you should employ encryption to protect your wireless network from all manner of attack and interception. Wirelss networks located far removed from other people, like rural locations, probably don’t run much risk without using wireless security. But we’re often better safe than sorry.
Most wireless network users will select one of three common forms of secure encryption: WEP, WPA, or WPA2. As a general rule of thumb, you should only use the older, less secure WEP security when you know your network must support users with only WEP-capable computers. WPA is stronger than WEP and supports a wide variety of computers. WPA2, the newest form of wireless security, is even stronger still, but supports only the newest wireless computers.
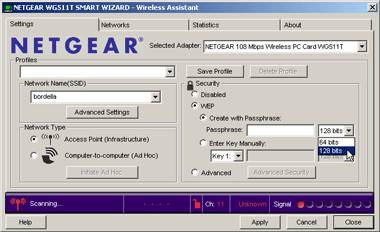
7a. If you must use WEP security, try to choose a key length of 128 bits. If your router or wireless computer do not support 128 bit keys, you can try 64 or 40-bit keys, but note that these are even less secure.
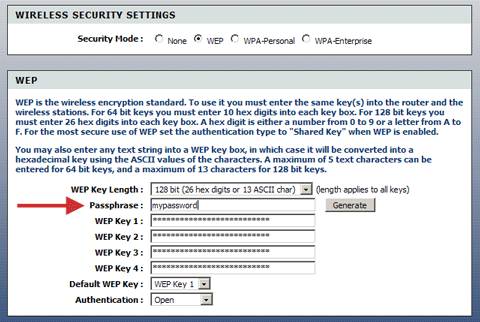
Supply a passphrase for your WEP encryption. Later you’ll need to use this same passphrase when configuring WEP on your wireless computer connection. Typically you can leave the remaining WEP options unchanged.
7b. Choose WPA2 encryption if supported by your wireless computers. Our particular router offers a mixed WPA mode which will connect to WPA2 where available or else try WPA. Your router may or may not offer this feature, in which case you may need to select WPA mode if your network users may use hardware which does not support WPA2.
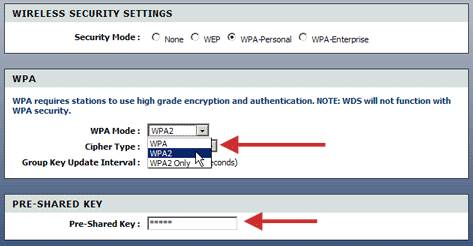
Your “Pre-Shared Key” is your WPA password. It must be longer than 8 characters up to 63. A longer, more difficult to guess key provides stronger security, but you must write it down somewhere safe because all connecting computers must use this password key.
Step 8: Going Wireless
With the above configurations saved you’re now ready to put the “wireless” in “wireless network.” Choose the computer you will use to make the wireless connection. If you’ll use the same computer you’ve been using to configure your router with the temporary Ethernet cable, remove that cable now.
If your portable computer is a newer model and includes built-in wireless support, be sure its wireless feature is switched on. On some portable models there is a switch on one side; on other models you enable wireless with a keyboard combination — check your user manual.
If you’ve added wireless hardware to a portable computer or a desktop PC, be sure to follow the manufacturer’s instructions for installing the appropriate drivers and software. This process varies widely from model to model.
Both Mac OS X and Windows XP include built-in software for connecting your wireless computer to the wireless network. Windows users may also have installed software provided by the vendor of your wireless hardware which can be used instead of Windows’ included software.
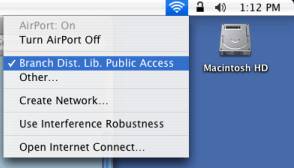
8a. Users of Mac OS X enjoy the easiest wireless connection process. Simply click the wireless icon at the top right of your screen and the drop down menu displays a list of available wireless networks. Choose one to join it. If you’ve secured your wireless network in Step 7, it will show a small lock beside its name, and the Mac will prompt you for the password key you created on the wireless router. (See Figure 9.)
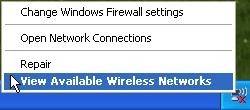
8b. Windows users will see a wireless system icon in the lower right of the screen. You can right-click this icon to pop open a menu from which you select “View Available Wireless Networks.” (See Figure 10.)
Windows will open a summary showing the wireless network you created on your router — and any other wireless networks your hardware sees in the vicinity!
In Figure 11, Windows sees the one wireless network transmitted from our router. As indicated, it is protected with WPA security.
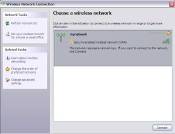
Click the “Connect” button and Windows will prompt for the password key you created in Step 7.
If you are using your wireless hardware vendor’s software rather than Windows’, it may look different — for example, Netgear supplies their own connection software with some models. In Figure 12, we use Netgear’s wireless connection software to connect to a 128-bit WEP-protected network.
Whatever wireless connection software you use, the end result should be the same: you’re connected!
You should now be able to access the Internet, if your router is connected to broadband, and share resources among your computers the same as on a wired network.
Your wireless network will perform best with a strong signal. Ideally, find a location for your wireless router which is far from dense obstructions. Where possible, locating your wireless router in a higher location (such as a second story) is preferred to a low location like a basement.
In part three we’ll take a closer look at fine tuning your wireless network performance and troubleshooting connection problems.


