Vista’s wireless networking interfaces differ from those of XP, but they still allow you to perform common network connection tasks and configurations.
Connecting to Wi-Fi Networks Using Windows Vista’s wireless networking interfaces differ from those of XP, but they still allow you to perform common network connection tasks and configurations.
There have been many changes to the networking features in Windows Vista. In this article, we’ll cover exactly how to connect to wireless networks and perform other connection configuration tasks using Vista.
Although the new networking interfaces in Vista may be better organized and enhanced for the majority of consumers, advanced PC users won’t care for the redesign. As you’ll see, accessing some networking configuration and connection detail windows now requires more clicks than before.
Connecting to a Wireless Network
One of the most similar networking tasks in Vista compared to XP is the process of connecting to wireless networks. The only major change is that the connecting window in Vista doesn’t provide direct access to the wireless network preferences and advanced settings. To access these items in Vista, you have to go to the Network and Sharing Center.
Here’s how to connect to a Wi-Fi network in Vista:
1. Right-click on the network status icon in the system tray, and select Connect to a network.
The connection window pops up:

2. Select the network you would like to connect to, and click Connect.
You may be informed that the network is unsecured (not using WEP or WPA), in response to which you would click Connect Anyway to proceed, or you may be prompted that the network is secured and that you need to enter a key to continue.
3. Once the connection is complete, Vista will let you know that it has successfully connected to the network, and you can click Close to exit the connection window.
Creating an Ad-hoc (Computer-to-Computer) Network
Creating an ad-hoc network in Windows XP was a bit crude. You would add a network to the preferred list and check the ad-hoc option, then you would have to do some tinkering to start getting it broadcasting as ad-hoc. However, Windows Vista includes a wizard dedicated to creating peer-to-peer ad-hoc networks.
Here’s how to access the ad-hoc setup wizard:
1. Right-click on the network status icon in the system tray, and select Connect to a network.
The connection window pops up.
2. Click the Set up a connection or network link.
The Connect to a Network window pops up.
3. Choose the Set up a wireless ad hoc (computer-to-computer) network option, and click Next. Then follow the on-screen directions.
Modifying Your Preferred Wireless Network List
Just like the majority of the other networking tasks and preferences, to prioritize your wireless networks and to configure other individual settings (such as auto connecting), you need to go to the Network and Sharing Center.
Here’s how to access the individual settings and preferences of wireless networks in Vista:
1. Right-click on the network status icon in the system tray, and select Network and Sharing Center.
2. In the Network and Sharing Center, click the Manage wireless networks link on the integrated task pane to the left.
The Manage Wireless Networks window pops up:
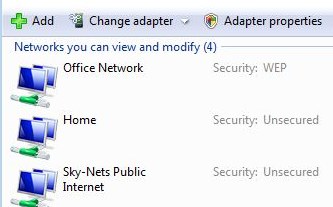
3. To change the priority of the wireless networks, use the move up/down arrows, which are visible after clicking on an entry. You can also double-click on an entry to configure its connectivity preferences (such as auto connecting) and security settings.
Checking Network Connection Details
In Windows XP, it was very easy to access the details of your network connections. Just hovering over the status icon in the system tray would give you the SSID or network name, data rate, signal and connectivity status; a quick double-click would give you the activity, duration and IP address information. This is not the case with Vista, however.
Hovering over the network status icon in Vista only gives you the SSID, signal and connectivity status; double-clicking only gives you links to access the Connect to a Network window and the Network and Sharing Center. Accessing the other information (IP address and data rate) takes a few more clicks.
Here’s how to access your network connection details in Vista:
1. Right-click on the network status icon in the system tray, and select Network and Sharing Center.
2. In the Network and Sharing Center, click the View status link next to the Network Name and SSID info.
The Network Connection Status window pops up:
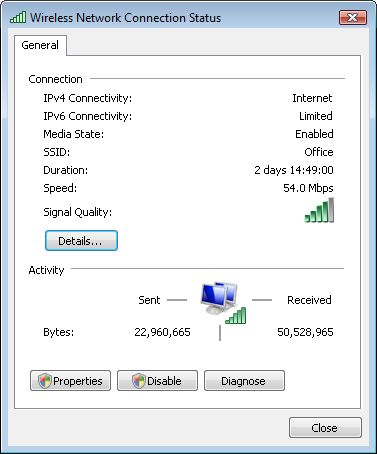
3. You now have access to most of the network connection details; however, for the IP address information, you have to click the Details… button.
Stay Tuned for more on networking using Windows Vista.
Eric Geier is the founder and president of Sky-Nets, Ltd., which operates a Wi-Fi hotspot network serving the general aviation community. He has also been a computing and wireless networking author and consultant for several years.


