
If you have an external cable or DSL modem, and no router, but you want to share your Internet connection using software such as ICS or WinProxy, you’ll need to add a second Network Interface Card (NIC) to your system. This can be the most trouble-prone and frustrating part of the entire process of sharing your Internet connection! Typical problems that you might encounter are:
Changing settings on one NIC affects the other NIC.
NICs work intermittently
BSOD (Blue Screen of Death… if you’ve never experienced this, you’ll know it when you see it) errors or lockups when booting.
Inability to see other machines in Network Neighborhood
Other hardware that was working fine stops working
Don’t have a free slot or IRQ.
In spite of all this, it’s important that you add the NIC for the reasons I describe on this page.
So if you’re running into problems trying to add that NIC, here are some Troubleshooting tips.
Tip #1: If you have Win98 and a USB port on your computer, spend a little extra money and save a lot of time by using a USB-Ethernet adapter. This page has more info.
Tip #2: We dislike making blanket statements, but try to stay away from 3COM NICs if you can help it. They tend to cause problems when using more than one of them. If you must use a 3COM, then check this page and this page if you’re having trouble getting them to play nice!
Tip #3: If you read the newsgroups, you may see threads debating whether to use ISA or PCI NICS. In my experience, either will work fine, but using two PCI NICs might make installing the second one easier due to a feature called IRQ Steering or IRQ Sharing.
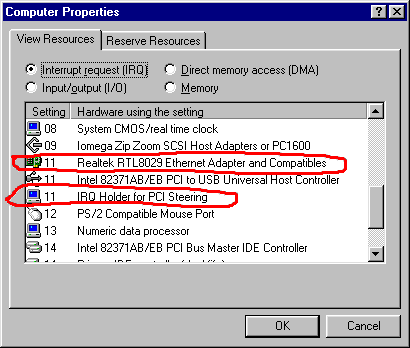
PCs have only 16 IRQs (numbered 0 through 15), but today there’s a lot more hardware competing for them. IRQ Steering lets the IRQs be shared by more than one hardware device. To see if you have this capability, use the Device Manager in the System Control Panel, and double click on the Computer icon.
If you see entries like the ones circled in red below, you have PCI Steering.
Just because you have it, though, doesn’t mean that you won’t have problems with it! If you do, try “Musical Chairs”, or try the steps on this page.
Tip #4: If you must use an ISA NIC, then you must have a free IRQ for it. Check this by again going to Device Manager (right click on My Computer, select Properties, and click on the Device Manager tab) and look for a missing number between 0 and 15. (In the example below IRQ10 is missing, so it’s available to be used.)

One caution, however, even if you find a free IRQ, your NIC may not be able to use it. ISA NICs usually can only be set to a limited range of IRQ numbers. Consult the documentation that comes with the NIC. You may have to reassign the IRQs for other devices in order to free up an IRQ that your NIC can use. However, if it comes to this, you may want to jump to Tip 6!
Tip #4a: If you have slots available, but no free IRQs, you’ll have to free up an IRQ by disabling the hardware that is presently using the IRQ. You do this via the Device Manager (Start > Settings > Control Panel > System). Select View Devices by Type and double click on the Computer icon.
This will bring up a window where you can see what hardware is using which IRQ. Find an IRQ that is compatible with your NIC and see if you can live without that hardware.
Disable the hardware by double clicking on its icon in Device manager. Then, in the Device Useage area of the window that comes up, either uncheck the Original Configuration(Current) box in Win95 or check the Disable in this Device Profile box in Win98.
Tip #5:
If you are using an older version of Win95, download and install the DialUpNetworking 1.3 update. This includes newer TCP/IP stacks and drivers that may help.
Tip #6: Go get another NIC.
Sometimes certain combinations of hardware just don’t work together (or are not worth spending the time on to find the obscure problem that is causing them to not work together)! There are plenty of fine NICs available from Asante, Linksys, Netgear, D-Link, SMC, UMAX and other companies.
Tip #7: If you want to use two of the exact same NIC in your setup,
you can try the following procedure so that you’ll be able to tell them apart:
Make a COPY of the driver floppy that comes with your NIC.
Find the Windows driver folder on the floppy (usually labeled WIN95) and find the .inf file.
Right-click on the file and select Open.
Find the string “DeviceDesc” in the .inf file. You may find a number of lines in the file that have this string in them. Keep looking until you see a line that has just has the name of the device in quotes. Here are some examples of what you might see in different .inf files:
USB\VID_0565&PID_0005.DeviceDesc = “LINKSYS USB Network Adapter”
kHomeFreePCMCIADeviceDesc = “Diamond Multimedia HomeFree PC Card”
Add (nic1) to the DeviceDesc string Don’t change any other information in the file!!. Save and close the file.
Install the first NIC using the disk.
NOTE you may need to delete the existing driver and use the “Add New Hardware” Control Panel if Plug and Play doesn’t prompt you to select a driver when it finds your card.Repeat Steps 2-6, but add (nic2) to the driver’s name and then install the second NIC.
Tip #8: Try a dual channel NIC.
These are expensive (~$200) and intended for server use, but it may be a solution when there are no other choices. Here are a few models:
- SMC EtherPower 10/100 PCI Dual NIC. (Buy.com)
- Intel Pro 100+ Dual Port PCI Server Adapter (Beyond.com)
Tip #9: Disable Plug and Play
(This tip courtesy of Greg Ward)
It is important to set the BIOS correctly. Especially with Win95 and when you have limited free IRQs (only one or two), Windows will fall over trying to deal with two NICs IF the BIOS Plug and Play is enabled. It will not be possible to get both NICs to work.
My method of addressing this is first to get Windows configured with only one NIC and the BIOS Plug and Play enabled.
Then go into the BIOS settings, disable the Plug and Play and allow Windows to boot. This will not affect the current settings.
Shutdown the PC and install the 2nd NIC. Windows will in most cases recognize the new NIC and allow for the driver installations. Because the BIOS Plug and Play is off, Windows can now even assign the NICs identical IRQs but different memory ranges. I presently have this configuration and it works flawlessly.
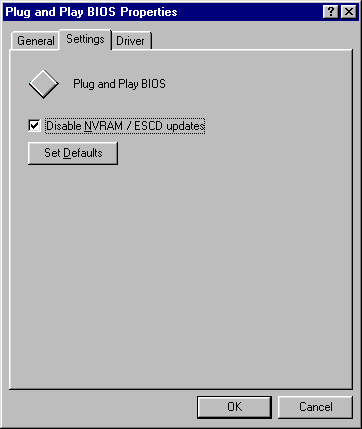
NOTE: Newer computers with newer BIOSes and Win98 have complicated disabling Plug and Play. You may also have to disable it in Device Manager in addition to the BIOS! You’ll find it under the System Devices branch. Disable it by checking the box as shown below.
Tip #10: Check Safe Mode
If all else fails, try this before you give up!
Tip #11: Musical Chairs
Reader Jeremy Burns sent in this tip:
I’m using a Dell Pent Pro (200Mhz) with an American Megatrends Bios that cannot disable PnP.
When I inserted a Linksys card, it grabbed IRQ 9, already being used by my 3Com card. Both were not working unless I disabled the Linksys card. Moving the Linksys card down a PCI did nothing. Of course, I could not manually adjust the IRQ. At this point I thought I was SOL and was up to 1:00 am trying to futz with IRQ sharing. Disabling sharing nuked everything, including my video card (also PCI). Of course I could not disable PnP because of the Bios. Dell had no useful suggestions. There were no jumpers on the motherboard to set IRQs on PCI slots.
The next evening I tried something novel, I moved all of my PCI cards to new slots. Call it the musical chairs approach. Bam. The Linksys card woke up on IRQ 3, 3com took 9, and I don’t know where the Video card wound up, but it worked.
A variation on this tip is to reinstall one card at a time, but in different slots than before. Note that you may have to delete the adapters via Device Manager for all the cards that you remove.
Tip #12: Clean up registry TCP/IP info
Bad information stored in the Registry can frustrate your efforts to install a Network adapter. Go here for help!
Can’t release your DHCP lease? Go here for help!
Tip #14: VIA chipset IRQ steering problems
If your PC is running Windows 98 or 98SE and uses one or more chips from VIA Technologies, you may have problems adding a second NIC.
![]() Tip: Read the “How do I know if I am using a VIA chipset?” item on the VIA FAQ page if you need help determining whether your computer uses a VIA chipset.
Tip: Read the “How do I know if I am using a VIA chipset?” item on the VIA FAQ page if you need help determining whether your computer uses a VIA chipset.
Go to this VIA page and download the the “4in1 driver” utility for your computer type. Then run the utility, but run only the “VIA PCI IRQ Miniport Driver” Installer. After you reboot your system, both NICs should now function.[Thnx to Richard Lawrence for this tip!]


