By Eric Geier
When the file sharing features of Windows and other OSs aren’t enough, you can consider network-attached storage (NAS) servers. These provide a central place to store and share your documents on the network. Some NAS servers can also encrypt the storage, so thieves can’t read the data if your file server gets stolen.
CryptoNAS (formerly CryptoBox) is one NAS project that makes encrypting your storage quick and easy. The project provides a Linux-based LiveCD and a package that’s installable onto existing Linux-based machines. All the open source code is licensed under the GPL.
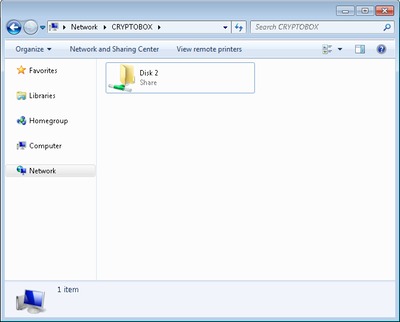
Once you setup CryptoNAS, the drives you choose will be available to the network users via a network share. For example, in Windows you could click Network or My Network Places, select the CryptoNAS computer, and you’d see an icon for each shared drive. Figure 1 shows an example.

Figure 1.
If you enable encryption on your drive(s), you create an encryption password. This password must be entered when opening the drive in CryptoNAS, sharing it on the network. If someone steals the drive, they cannot access your files unless they know your password.
In this tutorial, we’re going to setup CryptoNAS using the LiveCD. Now let’s get started!
System requirements
You can use pretty much any old PC with CryptoNAS; however, here are the minimum system specs:
- 200MHz CPU
- 64 MB of RAM
- CD-ROM drive
- Ethernet adapter
- Drive(s) for saving configuration and storage
The drive(s) can be any internal or external drive supported by the Linux kernel (2.6.20), such as IDE, SCSI, USB, FireWire, SATA, or RAID.
The installable package also requires the following:
- Linux kernel 2.6
- CryptSetup with LUKS support
- Kernel support for the crypt target of the device mapper
- Python 2.4
CryptoNAS can be compiled and installed onto pretty much any Linux distribution, but the project only provides packages for Debian and other Debian distributions, such as Ubuntu.
Preparing the storage disk
Keep in mind, you’ll have to format at least one disk later using CryptoNAS to create the configuration partition. Plus you have to format any drive(s) you want to encrypt. Formatting means all the files and data on the disk will be erased. So if the drive is used, you want to backup any files or documents you want to keep.
You can backup before setting up CryptoNAS by hooking the drive to another PC and copying the files to it. You can also do this after running CryptoNAS by opening the drive and copying the files over the network.
Preparing your network router
CryptoNAS is preset with an IP address of 192.168.0.23. You need to make sure your router is in the same subnet, which means its IP needs to be 192.168.0.1. Go to a desktop computer that’s already on the network, bring up the network connection details, and check the Default Gateway address. If it’s not set to this address, login to your router and change the address in the LAN/network settings.
Starting the CryptoNAS LiveCD
Now let’s get the LiveCD running:
- Download the ISO CD image.
- Burn the ISO file onto a CD.
- Connect the PC to your network via an Ethernet cable.
- Boot the PC, insert the CD, restart the PC, and give it a minute or two to load.
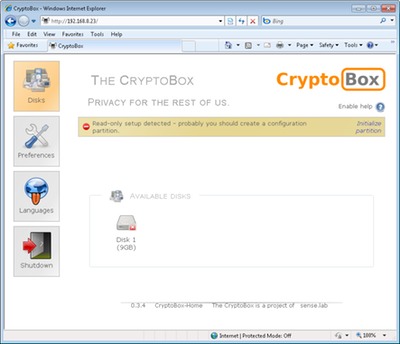
- Go to a desktop computer on the same network and point your Web browser to https://192.168.0.23. You’ll probably get a message about a problem with the security certificate since CryptoNAS uses self-signed certificates. Just ignore this and continue.
If everything works, you should see the Web-based GUI, such as Figure 2 shows. If you don’t, the LiveCD might not have loaded at boot. You may want to hook up a monitor to see what’s going on. If it doesn’t load, hook up a keyboard too, enter the BIOS, and configure the CD-ROM as a boot device.

Figure 2.
Configuring the CryptoNAS LiveCD
First, you should change the default login credentials, which is admin for both username and password. Click Preferences > Users and change the Admin password.
Next, you need to create a configuration partition. This is where the CryptoNAS settings will be stored. This can be on the same drive you want to use for storage. Warning: all the files and data on this drive/partition will be destroyed in the formatting process.
You should see a message about the configuration partition on the top of the Web-based GUI. Click Initialize partition on the right of the message and login using admin as the username and your new password. Select the desired disk to erase and use as the configuration partition and hit the Automatic setup button. If successful, you should see Initialization completed.
Now you can enable encryption on your drive(s). Click Disks, select a disk, and click the Format tab. Warning: all the files and data on this drive/partition will be destroyed in the formatting process. You’ll probably want to choose the Windows Filesystem type and enable Encryption. You’ll be prompted to enter a password for the encryption.
Then you’ll probably see a message that formatting is running. You can refresh or click the Disk icon again to check the status. Once completed, you’ll see a pad lock on the icon of the disk you just formatted and encrypted.
Opening a disk
To share a drive and access it on the network, you must first open it with CryptoNAS. Click Disks and select the desired disk. If the disk is encrypted (see Figure 3), enter the encryption password and click Open this volume; if not encrypted, just click Open this volume.
You’re finished
Now you can access the drive(s) on other computers via the network share. If you ever restart the CryptoNAS PC, you’ll have to reopen the encrypted drives. You can always bring the Web GUI back up via the CryptoNAS IP: 192.168.0.23.
Keep in mind, you can take your drives to other computers as needed; just make sure you close them in CryptoBox first. Even encrypted drives can be plugged into another computer if you use an encryption utility that supports cryptsetup-luks, such as FreeOTFE in Windows.
If you have questions or issues, check out the developer’s support area and FAQ.
Eric Geier is the Founder and CEO of NoWiresSecurity, which helps businesses easily protect their Wi-Fi with enterprise-level encryption by offering an outsourced RADIUS/802.1X authentication service. He is also the author of many networking and computing books.


