
By Eric Geier
You’ve probably figured out how to share and access files and folders among the computers on your home or small-office network, by browsing through My Network Places or Network. However, do you know you can secretly share folders or drives (called creating a hidden or administrative share) so not everyone on the network will see them when browsing through shared resources?
This tutorial will take you step-by-step through setting up and using hidden shares.
Why Use Hidden Shares?
Using hidden shares on your network is useful if you do not want a shared folder or drive on the network to be easily accessible. Hidden shares can add another layer of protection for shared files against unauthorized people connecting to your network. Using hidden shares helps eliminate the chance for people to guess your password (or be logged into an authorized Windows account) and then receive access to the shared resource.
Default Hidden/Administrative Shares
Windows automatically shares hard drives by default for administrative purposes. They are hidden shares named with the drive letter followed by a dollar sign (e.g., C$) and commented as Default Share. Thus, certain networking and administrator functions and applications can work properly. Not that preventing Windows from creating these hidden or administrative shares by default each time your computer boots up takes a registry change.
You can likely already access the hard drives of your Windows XP machines from other computers on the network, using the UNC path and an Administrators password, as explained near the end of the next section. However, in Windows Vista, you’ll be able to access these shares only if your computers are in a Domain instead.
Creating Hidden Shares in Windows
Creating a hidden share or converting a regular share into a hidden share is also essentially the same across all Windows versions and editions. To make a shared folder or drive hidden, simply add a dollar sign ($) to the end of the Share Name.
The following steps illustrate how to create a hidden share:
- In Windows XP, right-click on the folder or drive for which you want to create a hidden share and select Sharing and Security.The Folder Properties window will appear.
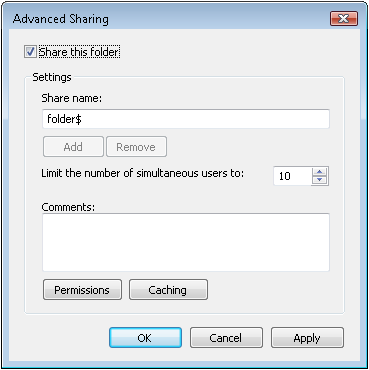
- In Windows Vista, right-click on the folder or drive for which you want to create a hidden share and select Properties. Then, on the Folder Properties window, click the Sharing tab and click the Advanced Sharing button.If User Account Control is active, enter an administrator’s password if required, and click the Continue button. The Advanced Sharing window will then appear.
- Select the Share This Folder or Share This Folder on the Network radio button or checkbox.Tip: If the folder or drive is already been shared, but you want to change it to a hidden share, you must first disable sharing (deselect the Share This Folder option and click OK), and then come right back to enable sharing using these steps.
- Enter a name for the share, followed by a dollar sign, into the Share Name text box, as the figure illustrates.
- If you’re using Simple File Sharing in Windows XP, check or uncheck the Allow Network User to Change My Files option. Otherwise, when using advanced sharing in XP or Vista, specify the remaining settings: Comments, User Limit, Permissions and Caching.
- Click the OK button.Now the folder or drive will be accessible manually from computers on the network. Of course, depending on which computers you’ve specified using the Permission settings, they can read/write to the folder.
Now, when you want to access the hidden share, bring up Internet Explorer or My Computer (or just Computer in Vista), enter the UNC path (\\computername\sharename$) of the share and hit Enter. Depending on the Permissions specified for the hidden share and the Windows account you’re currently logged onto, you’ll either have to enter a username and password or be given access right away.
Conclusion
You’ve discovered a file sharing technique that makes sharing folders and drives on your network inconspicuous. To wrap this tutorial up, here are two points and tips to keep in mind.
First, it’s important to understand that the presence of hidden shares isn’t completely undetectable by people on your network. Some network tools can search for and display the filenames within hidden shares. Hidden shares are, however, concealed from casual users browsing the network in My Network Places in Windows XP or Network in Vista.
Second, hidden shares also can have the same types of permissions imposed on them as regular shares. So you can still require a person to enter the login credentials of an account listed in the permission settings of the hidden share, or be logged into a Windows account with the same username and password, before the files can be opened.
Stay tuned — I’ll discuss mapping network drives in the next tutorial of this series.
Good luck in your networking endeavors!
Eric Geier is an author of many wireless networking and computing books including Home Networking All-in-One Desk Reference For Dummies (Wiley 2008) and Wi-Fi Hotspots: Setting up Public Wireless Internet Access (Cisco Press 2006).


