This guide contains affiliate links. If you buy through them we may earn a commission, at no extra cost to you.
That woodworking channel you have binged twice? It could vanish tomorrow. Creators delete back catalogues, videos get region-locked, and whole channels disappear after a strike. The only copy you control is the one sitting on your own hardware.
Here’s the thing most “YouTube to Plex” tutorials get wrong, though. They stop at the download. You end up with a folder of 400 files called things like How I Fixed My Router (NOT CLICKBAIT) [4K].mp4, Plex shows them as a wall of blank tiles, and nobody in the house ever watches them on the TV.
So we are going to do this properly. Downloading is step one of five. By the end you will have a self-updating YouTube library on your NAS, organised by channel, with proper posters, sorted by upload date, streaming to every TV, phone and tablet on your network. Plex or Jellyfin, your choice. Let’s build it.
The Five-Step Pipeline
Before we touch any settings, here is the whole system at a glance. The steps below are ordered the way you set things up (folders and naming first, so the downloader has somewhere sensible to put files), but day to day the archive runs top to bottom like this:
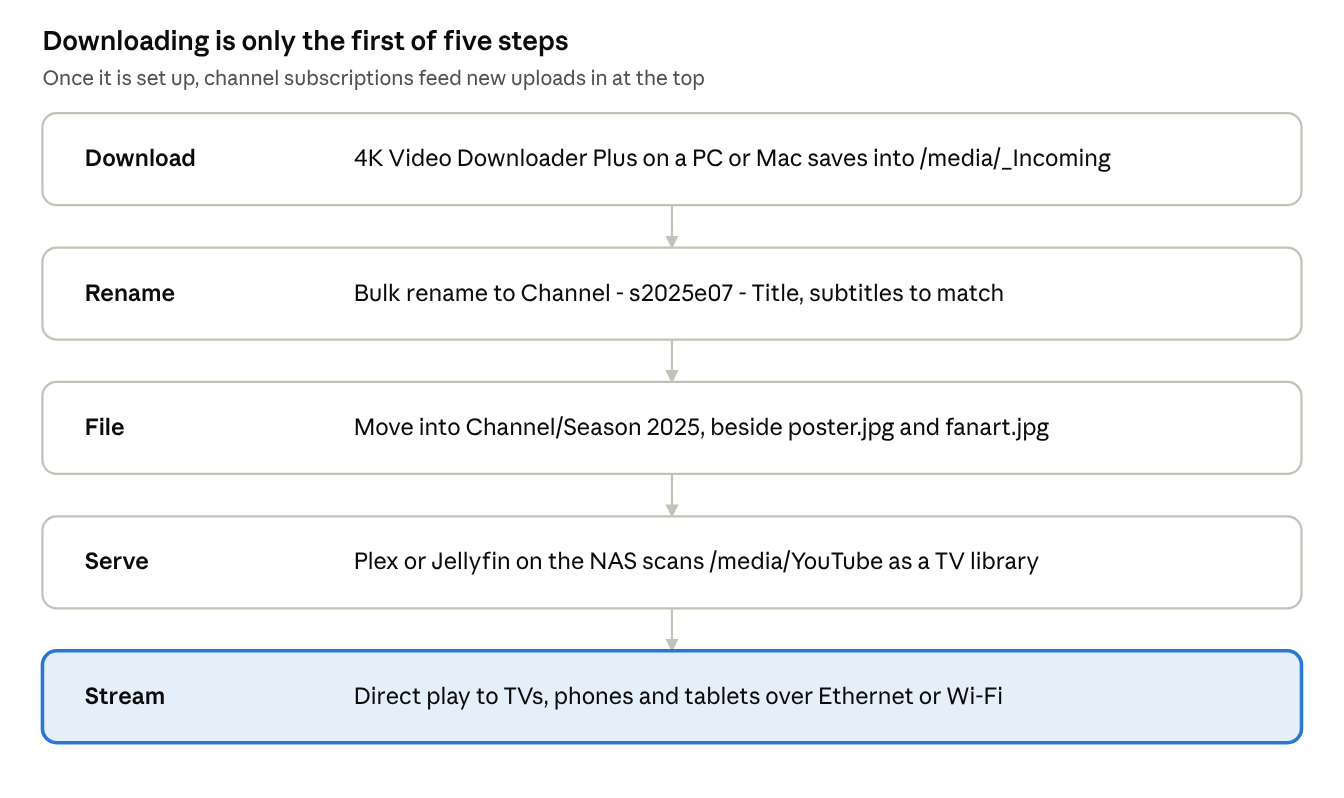
Get the middle three right and the last step takes care of itself.
What You Need
You need four things: storage on the network, a computer to do the downloading, a media server and a decent home network. Chances are you already own at least two of them.
A NAS. Any network storage box works: a Synology or QNAP, a UGREEN NASync, or a TrueNAS or Unraid box you built yourself. If you are still deciding, our NAS buy vs build guide covers the trade-offs, and if you have an old desktop gathering dust, you can build a NAS from an old PC with free software this weekend. One important point: a USB drive plugged into your laptop is not the same thing. If the files only exist on one machine, the TVs cannot reach them when that machine is asleep. Our DAS vs NAS explainer goes deeper.
A computer to run the downloader. 4K Video Downloader Plus is a desktop app for Windows 11, macOS 12 or newer, and Ubuntu 22.04 or newer. It does not run on Synology DSM or QNAP QTS, so it lives on a PC or Mac and saves across the network. If you want channel subscriptions to pull new uploads automatically, pick a machine that is on most of the day. A home-built NAS running Windows or Ubuntu desktop can do both jobs.
A media server. Plex Media Server or Jellyfin, installed on the NAS itself (both have Synology, QNAP, TrueNAS and Docker packages) or on any always-on PC. More on choosing between them in Step 4.
A wired backbone. Put the NAS on Ethernet, not Wi-Fi. TVs can stream over Wi-Fi 5 or newer without trouble, but the server end should never be the bottleneck.
What It Costs
| Item | Price at time of writing | Notes |
|---|---|---|
| 4K Video Downloader Plus Starter | Free | Caps how many videos it grabs from a playlist or channel, so fine for testing only |
| 4K Video Downloader Plus Lite | $15 per year | Personal use, annual subscription |
| 4K Video Downloader Plus Personal | $25 one-off | Personal use, lifetime licence |
| 4K Video Downloader Plus Pro | $45 one-off (normally $60) | All features, commercial use permitted |
| Jellyfin | Free | Open source, hardware transcoding included |
| Plex Media Server | Free, with optional Plex Pass | Hardware transcoding and some remote features need Plex Pass |
All four 4K Video Downloader Plus tiers are priced in US dollars on the developer’s site, and there is a seven-day trial of the premium features. Check the plan comparison before you buy: automatic in-app YouTube subscriptions are listed against the higher tiers, and that is the feature that makes this archive self-updating. For most people building a home archive, the Personal lifetime licence is the sweet spot if it covers the features you need.
Step 1: Plan The Folder Structure Before You Download Anything
Give YouTube its own top-level folder on the NAS, then one subfolder per channel. That single decision heads off most of the problems people hit later, because Plex and Jellyfin both treat each channel folder as a “show” and every video inside it as an episode.
The golden rule from Plex’s own documentation: keep different content types in separate root folders. If you drop YouTube videos into your Movies folder, the movie scanner will try to match Building A 10GbE Home Lab against film databases, fail, and leave you with junk. Separate roots, separate libraries.
Here is the layout we recommend:
/media
    /Movies
    /TV
    /YouTube
        /Linus Tech Tips
            /Season 2025
            /Season 2026
            poster.jpg
            fanart.jpg
        /Technology Connections
            /Season 2024
            /Season 2025
            poster.jpg
            fanart.jpg
    /YouTube Playlists
        /Learn Python Course
            /Season 01
A few things to note:
- Seasons are years. Big channels upload hundreds of videos. Year folders keep each season browsable on a TV remote instead of one endless scroll.
- Playlists get their own root. A course or a series where order matters (part 1, part 2, part 3) behaves differently from a channel archive, so give it a separate library with plain numbered seasons.
- Artwork lives in the channel folder.
poster.jpgandfanart.jpgnext to the season folders are picked up as local artwork by both servers. Grab the channel’s profile image for the poster and its banner for the fanart. Two minutes per channel, and your library goes from blank tiles to something that looks like Netflix. - Use a shared folder, not a home folder. Create a dedicated share (we call ours
media) so the downloader PC, the media server and any other device can all reach the same path.
On Synology, create the share in Control Panel then Shared Folder. On QNAP it is Control Panel then Shared Folders. On a DIY TrueNAS box, create a dataset and share it over SMB. If you followed our guide to building a NAS from an old PC, you already have an SMB share ready to go.
Step 2: Name Your Files So Plex And Jellyfin Actually Behave
YouTube videos will never match a public database like TMDB or TheTVDB. So the trick is not to make them match. Instead, you name each file so the server knows which channel it belongs to and where it sits in the order, then let the server read everything else from the file and folder.
There are two naming patterns worth using.
Pattern A: Date-Based (Best For Plex)
Plex’s TV scanner officially supports date-based episodes, the same format it uses for daily talk shows:
/YouTube/Technology Connections/Season 2025/Technology Connections - 2025-03-14 - Dishwasher Detergent Explained.mp4Plex sorts episodes by that date, so a channel plays in upload order. It accepts 2025-03-14, 2025.03.14 or 14-03-2025, so pick one and stick with it. The catch is that you need each video’s upload date, and you will be adding it by hand or with a renaming tool.
Pattern B: Numbered Episodes (Works Everywhere)
The classic sXXeYY pattern works in Plex, Jellyfin and Emby with zero fuss:
/YouTube Playlists/Learn Python Course/Season 01/Learn Python Course - s01e07 - Functions And Return Values.mp4This is our pick for Jellyfin and for anything where order matters. Jellyfin’s own forum regulars point people towards plugins when asked about date-only naming, whereas sXXeYY just works. For a channel archive, use the year as the season number (s2025e01, s2025e02) and you get the best of both.
Getting There Without Renaming 300 Files By Hand
4K Video Downloader Plus saves files under the video’s title. To convert those into either pattern:
- Turn on playlist numbering in the downloader. Check its settings for the option to add numbers to file names when downloading a playlist or channel. That gives you the order for free.
- Bulk rename. On Windows, Advanced Renamer or Bulk Rename Utility (both free for personal use) can turn
07 Functions And Return Values.mp4intoLearn Python Course - s01e07 - Functions And Return Values.mp4in one pass. On a Mac, Finder’s built-in Rename Items does a decent job, and A Better Finder Rename handles the complex stuff. - Keep subtitles next to their video. A subtitle file must share the video’s name plus a language code:
... - s01e07 - Functions And Return Values.en.srt. Rename them in the same pass.
Some rules that will save you a headache:
- Avoid words Plex treats as extras, such as
trailer,behindthescenesorinterview, at the end of a file name. Plex users have reported videos vanishing from libraries because of exactly this. - Strip characters Windows hates (
: ? " < > |) from video titles. Most renamers do this automatically. - Put anything you want ignored in square brackets, for example
[4K]or[2160p]. Plex skips bracketed text when matching. - Plex does not read the episode title from the file name in a personal media library. If titles matter to you, Jellyfin handles that better, or you can edit titles in Plex directly.
Power users who want fully automatic naming, upload dates and descriptions can graduate to command-line tools like yt-dlp paired with Jellyfin’s YouTube Metadata plugin. For most households, though, a GUI downloader plus a five-minute rename session per channel gets you most of the way with none of the scripting.
Step 3: Download Straight To The NAS With 4K Video Downloader Plus
This is the bit every other guide covers, but we are going to set it up so files land on the NAS, not your laptop’s SSD. No copying, no “I’ll move them later”, no running out of space on a 256GB MacBook.
Map The Network Share
First, make the NAS share look like a normal drive to the downloader.
- Windows 11: open File Explorer, right-click This PC, choose Map network drive, pick a letter (we use
Y:), enter\\YOUR-NAS-NAME\mediaand tick Reconnect at sign-in. - macOS: in Finder press Cmd+K, enter
smb://your-nas-name.local/mediaand connect. Then add the mounted share to System Settings, General, Login Items so it remounts after a restart. - Ubuntu: connect through Files, Other Locations, using the same
smb://address, or add a permanent mount to/etc/fstabif you are comfortable with that.
Create A Staging Folder
Here’s a pro tip most people learn the hard way. Do not download directly into your library folders. Create /media/_Incoming outside the YouTube root instead. Downloads land there, you rename them, then you move them into the right channel and season folder. Your media server never scans half-finished files or ugly raw titles, and a botched rename never pollutes the library.
Set Up Smart Mode
Smart Mode is the feature that turns 4K Video Downloader Plus from a one-off tool into a pipeline. Click the light bulb icon in the toolbar to switch it on, and set your defaults once:
- Format: MP4 for 1080p and below, because it plays natively on almost every smart TV and streaming stick. MKV for 4K, which is what the developer recommends for long, high-quality videos.
- Quality: 1080p is the sweet spot for a big archive. Go 4K only for channels where image quality is the point, like drone footage or nature content.
- Subtitles: turn on subtitle download, choose your language and save as SRT so Plex and Jellyfin can display them as a selectable track.
- Destination: your mapped
_Incomingfolder.
From now on, every paste of a link downloads with those settings, straight to the NAS.
Grab Playlists, Channels And Subscriptions
Copy a playlist or channel URL from YouTube, click Paste Link, and the app offers to download the whole lot. It can also grab Watch Later, Liked videos and private playlists you have access to once you sign in through its built-in browser.
The killer feature for an archive is subscriptions. Subscribe to a channel or playlist inside the app and new uploads download automatically as soon as they are published, provided the app is running. Pair that with an always-on machine and your archive genuinely maintains itself. You only drop in occasionally to rename and file the new arrivals.
One honest note on speed: on a wired gigabit network the NAS will happily take more than 100MB/s, so your broadband connection is almost always the bottleneck. Downloading over Wi-Fi from a laptop works, but a wired desktop is noticeably more reliable for big channel grabs.
Step 4: Set Up The Library In Plex Or Jellyfin
Both servers can do this well. Plex is the more polished experience with apps on almost everything. Jellyfin is free, open source, needs no account and gives you hardware transcoding without a subscription. If you already run one for films and TV, just use that.
| Plex | Jellyfin | |
|---|---|---|
| Price | Free server, Plex Pass optional | Free |
| Hardware transcoding | Plex Pass required | Included |
| Account needed | Yes, a Plex account | No, fully local |
| TV apps | Native on most smart TVs, Apple TV, Fire TV, Roku, consoles | Android TV, Fire TV, Apple TV (Swiftfin), LG webOS, Roku; Samsung needs more effort |
| Date-based episode naming | Officially supported | Use sXXeYY for reliability |
| Reads NFO files for descriptions | No | Yes |
Plex: Create A TV Library With The Personal Media Agent
- Open Plex Web, click the plus next to your server and choose Add Library.
- Pick TV Shows as the type and name it YouTube.
- Add your folder:
/media/YouTube(the folder that contains the channel folders, not a channel folder itself). - Open Advanced and change the Agent to Personal Media Shows. This stops Plex trying to match channels against TV databases. Leave Local Media Assets enabled so it picks up your
poster.jpgandfanart.jpg. - Click Add Library and let it scan.
Repeat for /media/YouTube Playlists as a second library if you created one.
Why not the Other Videos library type? It works, and it is fine for a loose pile of clips, but it treats every file as a standalone item. You lose the channel grouping, the seasons and the play-next-episode behaviour that makes binge-watching a channel feel natural.
Synology users: if the library comes up empty, it is almost always permissions. Give the Plex user read access to the media share in Control Panel. It catches out experienced Plex users too.
Jellyfin: Create A Shows Library With Metadata Fetchers Off
- Go to Dashboard, then Libraries, then Add Media Library.
- Set Content type to Shows and the display name to YouTube.
- Add the folder
/media/YouTube. - Untick the online metadata downloaders and image fetchers (TheMovieDb, TheTVDB and friends). They will never find these videos and will only slow scans down.
- Make sure local images are allowed, then save and scan.
Want proper episode descriptions? Jellyfin reads NFO files. A small text file with the same name as the video and an .nfo extension, containing a title and plot, will show up as the episode summary. It is optional, but lovely for a curated archive.
If you later move to a yt-dlp based workflow, the Jellyfin YouTube Metadata plugin can pull titles, descriptions and thumbnails automatically, and the TubeArchivist plugin does the same for TubeArchivist users. Both are aimed at people happy to run Docker containers.
Step 5: Stream To Every TV In The House
This is the payoff. Install the Plex or Jellyfin app on each TV, sign in (or point Jellyfin at your server’s local address, something like http://192.168.1.50:8096), and your YouTube library appears alongside everything else. No ads, no autoplay rabbit holes, no recommendations sneaking into the kids’ viewing.
But whether it plays smoothly comes down to two things: codecs and your network.
Direct Play Versus Transcoding
When a TV can decode a file natively, the server simply sends it across the network. That is direct play, and it barely touches the NAS’s processor. When the TV cannot handle the format, the server converts it on the fly. That is transcoding, and it is where a modest NAS starts to sweat.
YouTube’s higher resolutions typically use VP9 or the newer AV1 codec. Plenty of recent TVs and streaming sticks decode both, but older sets and some budget sticks do not. If your TV is more than a few years old:
- Stick to 1080p MP4 for the bulk of your archive. It direct plays on practically everything.
- Reserve 4K MKV downloads for the one TV you know handles them.
- If you need transcoding, a NAS or PC with an Intel CPU that supports Quick Sync makes a huge difference. Jellyfin uses it for free. Plex needs a Plex Pass.
The quickest test: play a 4K file on each TV and check the server dashboard. Plex shows “Direct Play” or “Transcode” against each stream, and Jellyfin’s dashboard shows the same under active sessions.
Wi-Fi Or Wired?
A 1080p YouTube file needs only a few megabits per second. Even a 4K stream typically sits comfortably below what a mid-range Wi-Fi 5 or Wi-Fi 6 router delivers to a TV in the same room. Bandwidth is rarely the problem. Signal strength in far rooms is.
- The NAS goes on Ethernet. Always. It may be serving three streams at once while also receiving downloads.
- Wire the main TV if you can. Most smart TVs have an Ethernet port, and it removes Wi-Fi from the equation entirely.
- Use mesh for distant rooms, ideally with wired backhaul between nodes. Wireless backhaul halves usable bandwidth on many systems, which is when you see buffering on high-bitrate files.
- Powerline adapters are a reasonable fallback in older houses with thick walls, though results vary wildly with your wiring.
Profiles, Kids And Watching Away From Home
Both servers let you create managed profiles and restrict which libraries each person sees, so the children’s playlist library can be the only one on the playroom TV.
Watching outside the house is where the two diverge. Plex handles remote access through its own relay and account system, with some features behind Plex Pass. Jellyfin expects you to bring your own route in, such as a VPN like Tailscale or WireGuard on your router. More set-up, but nothing leaves your control.
How Much Storage Does A YouTube Archive Need?
Roughly 2GB per hour at 1080p and 8 to 10GB per hour at 4K. Resolution choice matters far more than the number of channels you follow. These are approximate figures based on typical YouTube bitrates, and fast-moving content like gaming runs higher than talking-head videos.
| Quality | Approx. per hour | A 500-video channel (15 min average, about 125 hours) |
|---|---|---|
| 720p | 1GB | 125GB |
| 1080p | 2GB | 250GB |
| 1440p | 4GB | 500GB |
| 4K | 8 to 10GB | 1 to 1.25TB |
A two-bay NAS with a pair of 8TB drives in a mirror gives you around 7TB of usable space, room for around 25 big channels at 1080p, or fewer if it also holds your films. Just remember that RAID protects you from a dead drive, not from accidental deletion or a failed NAS. If this archive genuinely matters, keep a second copy on a USB drive or in cloud storage.
Troubleshooting
| Problem | Likely cause | Fix |
|---|---|---|
| Library is empty after scanning | Media server cannot read the share | Give the Plex or Jellyfin user read access to the share, then rescan |
| Some videos are missing | File names lack an episode number or date, or end in words like trailer or interview | Rename to Pattern A or B and remove extras keywords |
| Videos appear in the wrong order | Mixed naming within one channel | Use one pattern per channel, and check the season folder matches the season in the file name |
| Blank grey tiles instead of artwork | No local artwork, or local assets disabled | Add poster.jpg and fanart.jpg to the channel folder and enable local media assets |
| Subtitles do not show up | Subtitle name does not match the video | Name it exact video name.en.srt in the same folder |
| Buffering on one TV only | Transcoding or weak Wi-Fi in that room | Check the dashboard for Transcode; download 1080p MP4 or wire that TV |
| New subscription videos stop arriving | Downloader PC asleep or share not mounted | Disable sleep on that machine and set the share to reconnect at sign-in |
A Quick Word On The Rules
YouTube’s terms of service do not permit downloading videos outside its own offline features, and most videos remain the copyright of their creators. In the UK, copying a video for private use is not automatically covered by an exception either. So keep your archive to content you have the right to keep: your own uploads, Creative Commons licensed videos, public domain material, and anything a creator explicitly allows you to download. Never re-upload or share what you archive.
If a creator you love offers their back catalogue through Patreon, Nebula or a paid download, that is the best way to archive it and it puts money in their pocket too.
Your Turn
That is the whole pipeline: download, organise, name, serve, stream. Once it is running, the only regular job is a few minutes renaming new arrivals and dropping them into the right season folder.
Are you team Plex or team Jellyfin, and have you found a cleaner way to handle naming for big channels? Tell us in the comments. And if you are still on the fence about the hardware side, start with our guide to building a NAS from an old PC. It is the cheapest way into all of this.
Frequently Asked Questions
Can Plex Download YouTube Videos Itself?
No. Plex and Jellyfin are media servers, not downloaders. You need a separate tool such as 4K Video Downloader Plus to save the videos, then point Plex or Jellyfin at the folder where they land.
Can I Run 4K Video Downloader Plus On My Synology NAS?
Not directly. It is a desktop app for Windows, macOS and Ubuntu. Run it on a PC or Mac and save to the NAS over the network, as shown in Step 3.
Should I Use An Other Videos Or TV Shows Library In Plex?
TV Shows with the Personal Media Shows agent, for channel archives. You get channels as shows, years as seasons and proper play-next behaviour. Other Videos is fine for a handful of unrelated clips.
Does Jellyfin Get YouTube Metadata Automatically?
Not out of the box. Use clear sXXeYY naming and local artwork, add NFO files for descriptions, or move to a yt-dlp workflow with the YouTube Metadata plugin for full automation.
MP4 Or MKV For A YouTube Archive?
MP4 at 1080p for maximum compatibility with TVs and streaming sticks. MKV for 4K downloads, where it is the format the downloader recommends.
Will New Videos Download Automatically?
Yes, with in-app subscriptions, as long as the app is running and the NAS share is connected. Check which licence tier includes subscriptions before you buy.