Model: RT314
By: Tim Higgins
Review Date: 8/2/00
| Pros: | – Very Fast! – Reliable PPPoE connection |
| Cons : | – Limited, single port mapping. – Access control (Filters) difficult to configure |
Updates
8/19/00: Clarified that the RT314 has a faster processor than the RT311.
8/3/00: Info added about MacOS syslog shareware client and Dynamic DNS support.
The Stats
Check the Router Comparison chart for a summary of the RT314’s capabilities.
The Basics
| Indicators | PowerTest100Mbps, Link/Activity, for each of four LAN portsLink/Activity for the WAN port |
| Connectors | One RJ45 10BaseT for the WANFour RJ45 auto sensing 10/100BaseT LANPowerConsole (9p female D serial port) |
| Comes with | printed Installation guide sheetCDRom with HTML Applications notes, PDF copy of User guideone normal UTP cable |
| Other | NO Hardware Reset switchNO Uplink or Normal / Crossover switch for LAN Ports (see this page if this concerns you!) |
Introduction
I’ll give you the bottom line first. If you liked the RT311, then you’ll be very happy with the RT314. The built-in 4 port 10/100 switch works fine, I didn’t have connection problems with any of my NICs, and routing speed is beyond what I’m able to test!
The feature set is basically the same as the RT311’s (if you install the 3.20 firmware), and the router is the same beast as the ZyXEL Prestige 314 (ZyXEL actually OEMs the unit to Netgear), except for pricing, packaging, support and warranty.
NOTE:
Note that the RT314’s hardware is completely different than that of the RT311 and includes a faster processor. This means that although you can upgrade the RT311 firmware to 3.20 and get the same feature set, you won’t be able to increase the speed of the RT311.
So if that’s all you need to know, then see ya! Otherwise, read on for more details.
Setup and Basic Features
The RT314 comes with an “Installation Guide” poster which walks you through setup basics. (The RT314 manual can be found here (833KB PDF format). The Netgear website is also helpful and includes FAQ , applications notes, and a download area for firmware updates. The website also has the Release Notes for the 3.20 firmware, which contains some helpful information and which is not on the CD that comes with the router.
The router default configuration has the WAN set to be a DHCP client and the LAN DHCP server enabled, so many users will just be able to plug and go. It also comes set to 192.168.0.1 and a default password, which you should change as soon as possible, since it’s commonly known!
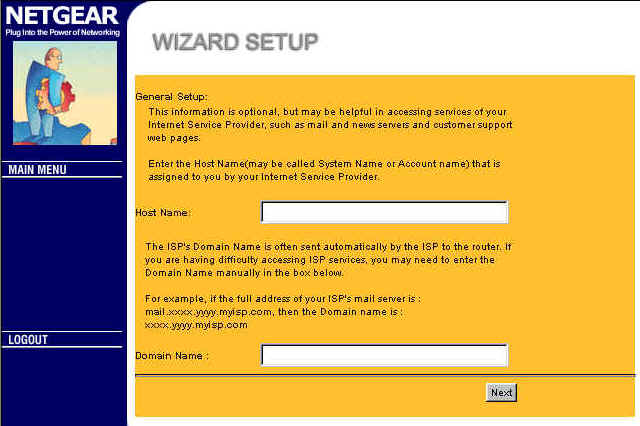
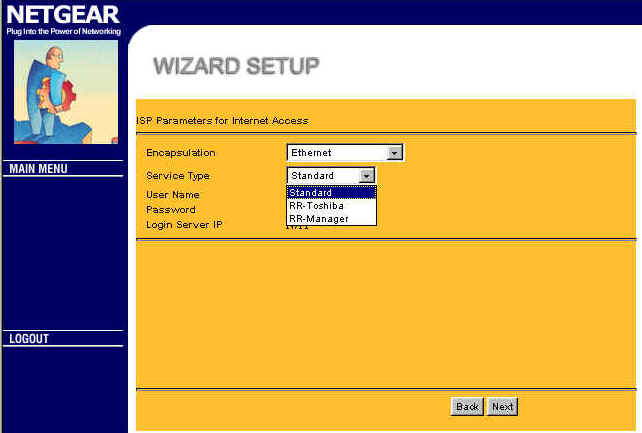
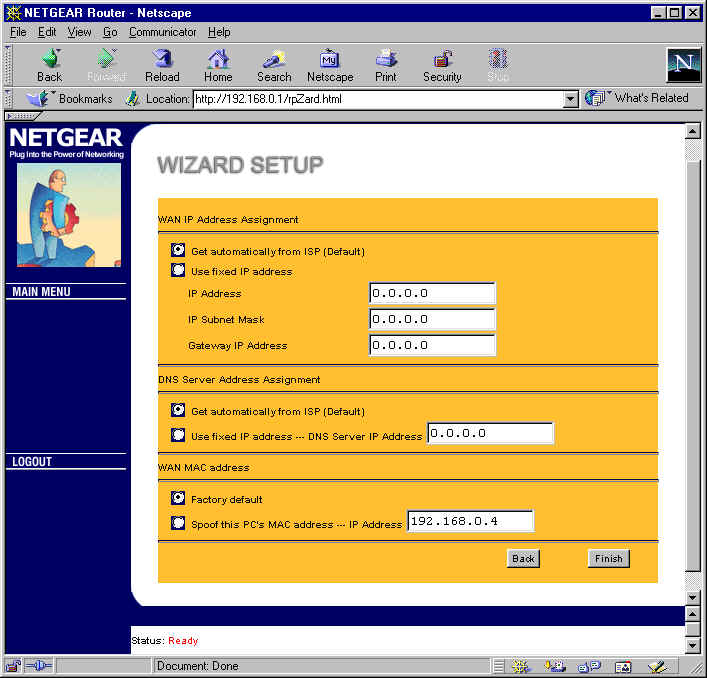
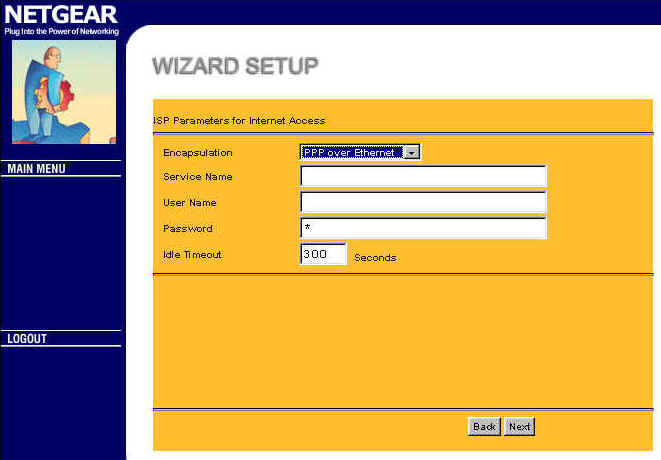
The 3.2 firmware (which can also be loaded into the RT311), substitutes a web-browser based setup utility for the ill-fated FirstGear setup program. Note that I said setup utility, not administration interface. The web setup allows you to set only the basics (as shown in the three screens below), and also lets you pop up a “Statistics” screen to see how much traffic has flowed through the router.
(click on an image to open a new window with a full-sized view)

You’ll still need to fire up your favorite Telnet program to use the router’s “Manager Interface” to setup port mapping (called SUA server), configure Access controls (called Filters), or do anything else. You can Telnet in either via either Ethernet interface, or serial Console port.
Remote Administration
For remote administration, you can Telnet into the “Manager Interface” from the WAN side, after you figure out how to disable the default FTP, Telnet and HTTP WAN filter!
Neither the Resource Guide nor Applications notes on the CD have been changed to reflect that the WAN filter settings are now accessed via Menu 11’s “Session Options: Edit Filter Sets”, and not “Menu 4.1 – WAN Port Filter Setup”, which doesn’t exist any more. The Netgear website version of the FAQ, however, gives the correct information.
While checking out the setup pages, I noticed that “loopback”, i.e. the ability to access a mapped server from a LAN-side machine using the router’s WAN-side address, was kind of funky. I had an HTTP server SUA setup to port 80, but when I typed the WAN-side address into my browser, the RT314’s web setup screen came up, not my webserver’s home page! My webserver’s home page came up when I accessed the WAN-side address from a WAN-side computer, however, but I couldn’t raise the setup screens on port 8080, 8888, 888, etc.
The router allows only one login at a time, whether via the web or Telnet interface, but the messages (or lack thereof) that the second user gets can be confusing. The Manager Interface will also log you out automatically after 5 minutes. If you want to change this value you can, but you need to drop down to the third control interface, the command line interface mode. This mode can be accessed from the Telnet interface and if you love typing cryptic commands in response to cryptic prompts, you’ll be right at home!
More setup & Firmware upgrading
You can manually set the RT314’s WAN port information or have it act as a DHCP client and obtain everything automatically. It can handle “host name” authentication (like @Home uses) , the RoadRunner TAS Authentication methods, and allow you to set the WAN interface MAC address equal to that of a NIC connected to the LAN side.
This last method will help MediaOne/RR users whose service is tied to a specific NIC avoid having to call in their new MAC address.
On the LAN side, you can set the starting IP and range of addresses that the DHCP server will hand out (up to a max of 32 addresses), or disable it and assign your IP info manually. Note that the DHCP server will also hand out Domain information if you’ve entered it, a handy feature for @Home users.
The PPPoE setup screen (shown below) allows you to enter your account login information and set an idle timeout.

