
By Eric Geier
The Internet is a never-ending web of information, photos, videos, files, and people. We all know some of this material is good and some of it is bad. To protect your children from the bad portions of the Internet, you need to couple a parental control system with good ol’ supervision.
In this article, we’ll discover how Windows 7 can help protect your youngsters. We’ll review its Parental Controls. We’ll set up time limits for computer usage, set gaming and program restrictions, enable web filtering, and check out activity monitoring.
This is only Microsoft’s second Windows edition with Parental Controls. They first debuted with Windows Vista. They were long overdue. Before that, parents didn’t really have any control over their children’s computer usage unless they used a third-party application.
Getting Started
Let’s bring up the Parental Controls. The quickest way is to click Start, type Parental Controls, and hit Enter. You can also navigate there: click Start > Control Panel, click User Accounts and Family Safety, and click Parental Controls.
Figure 1 shows an example of this main Parental Controls window.
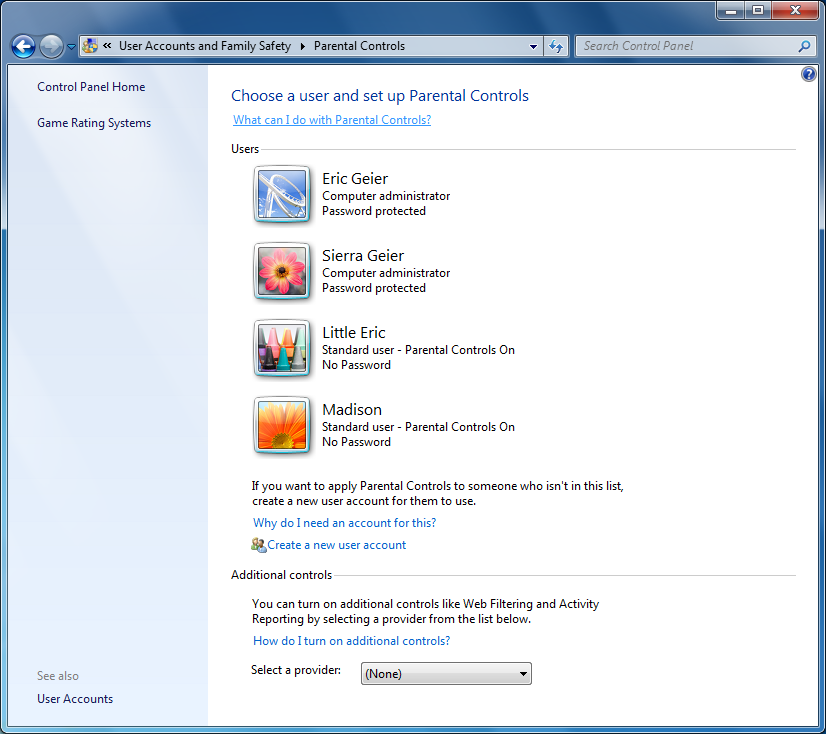
You’ll see an icon for each user along with their details. Simply click the icon for the user account you want to configure with Parental Controls. If the account is classified as an Administrator, you’ll receive a prompt about converting it to a Standard account that can have Parental Controls imposed.
As Figure 2 shows, on a user’s page you’ll see their Parental Controls status and shortcuts to configure the settings.

If you used the Parental Controls in Windows Vista, you might notice something missing: the Web Filtering settings. That’s because Microsoft removed the native web filter and created an add-on type of approach as we’ll discuss later.
Configuring the Basic Settings
The first step is enabling Parental Controls for a user. On a user’s Parental Controls page, select the On, enforce current settings option on the top. Now that they’re on, you must configure the settings.
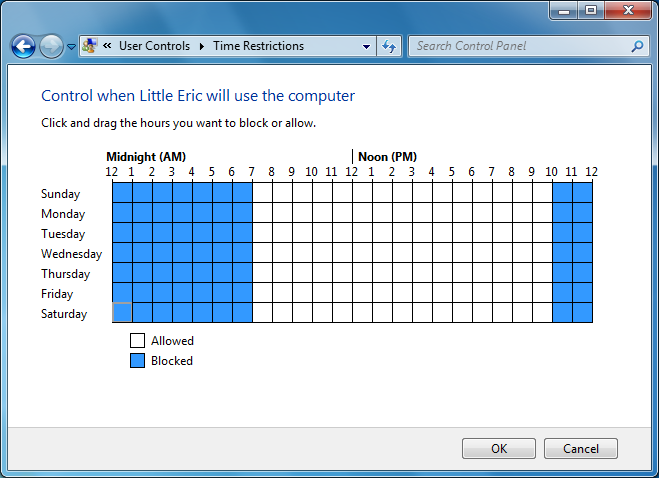
To configure exactly when they can or cannot use the computer with their account, click the Time limits link. Using your cursor, you can highlight the blocks of time you want to prevent computer access to the color blue. If you mess up click or highlight them again to change them back to white. Figure 3 shows an example of blocking a user from the computer during the hours of 10pm to 7am. When you’re done, click OK.
Next you can configure gaming restrictions by clicking the Games link off the user’s main window. Then you can specify whether or not he or she can play any games. If you allow games, you can then choose which game ratings to allow and/or block or allow specific games.
Next you can optionally set program restrictions; click the Allow and block specific programs link on the user’s main Parental Control page. You can simply allow he or she to use all programs or choose only those you approve. Manually selecting programs is usually the best approach for the best protection, but takes the most time to setup. For instance, if you find programs later you should have added, you must log off or switch users to get into your Administrator account to change the program restrictions.
Getting Web Filtering and Monitoring
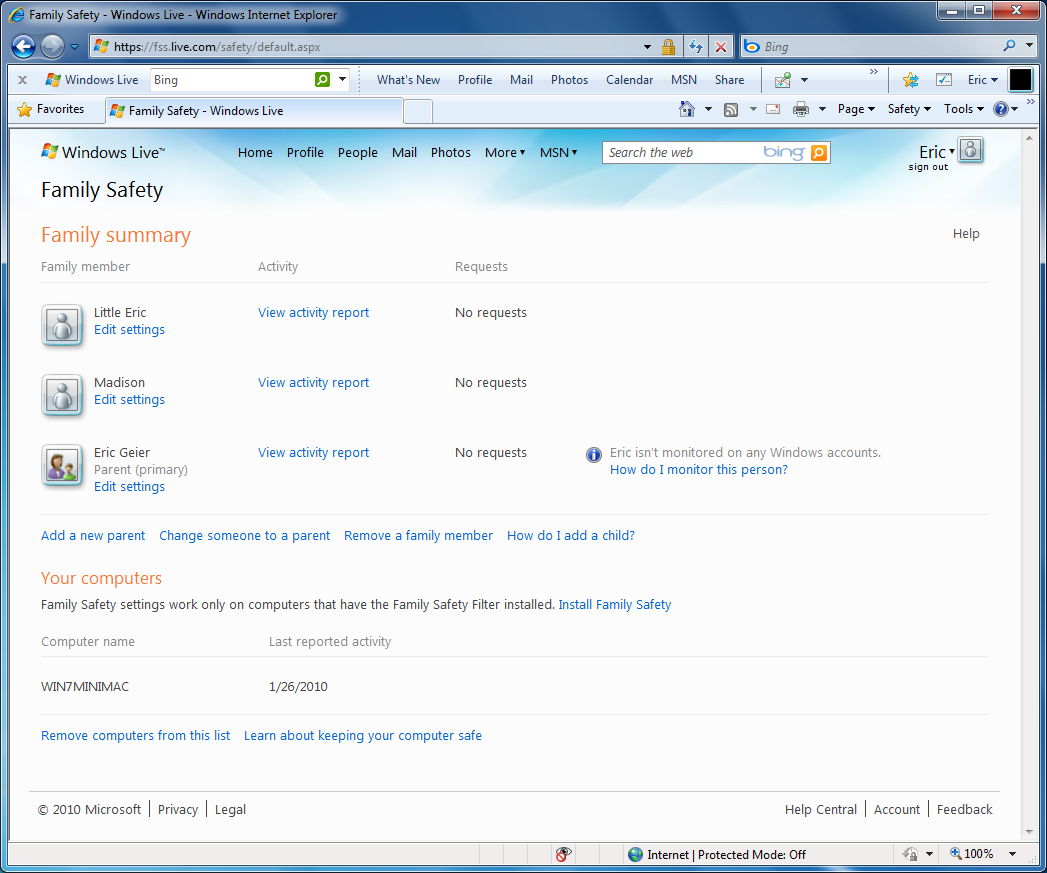
As mentioned before, Microsoft used to offer web filtering and monitoring in Windows Vista. They still offer this in Windows 7; however you must install the free Family Safety component from the Windows Live product-line. Though it’s an extra step, you now set and review the filtering and monitoring via a web site, such as Figure 4 shows. Now you can review settings and check reports without physically being on the child’s PC.
If you want this functionality, go to the Windows Live site and download it. During the installation, you can uncheck the other Windows Live components if you prefer only to install the filtering and monitoring. Remember, this filtering only works on computers that you’ve installed it on. If your children use multiple computers, you must install it on each.
Once it’s installed, go back to the Parental Controls window. Then under the Additional Controls area, select the Windows Live Family Safety option as the Provider. Your web browser should then pop-up and ask you to login with the Windows Live ID which you created when downloading the component.
You configure the Family Safety settings via the web browser at their site: http://fss.live.com. Don’t worry if you forget the URL. You can always bring up the site by clicking the shortcut under a user’s Parental Control page in Windows.
Don’t Stop at Controls and Filtering
We’ve set up the Parental Controls in Windows 7 to help protect our youngsters on the computer and Internet. Remember, you still need to keep track of their usage and activity. One last tip: Everyone should use a password, so they can’t login to your Administrator account and they can’t login to their sibling’s account which may have different restrictions.


