
If your local network doesn’t work before you install sharing software, it won’t get any easier after you add it! So, do yourself a favor and get your local network talking TCP/IP before you attempt to install your sharing software.
To avoid headaches…
Before you go off and get setup, please note the following points that should make things easier for you:
Know what IP address is assigned to which physical NIC in the computer that is running the sharing software (the Sharing server), so that you attach the sharing Client computers to the correct one. Things are easier to sort out if you use cards from two different manufacturers or at least different model numbers from the same manufacturer. Here’s why. If you already have two of the same card and they are not from 3COM, you can try this procedure to attempt to tell the two cards apart.
Don’t use a HOST or LMHOST table on any machines. Yes, it’s nicer to be able to refer to machines by name and if you have a larger network, or already know how to use Host tables, then great, use them. However, in a small network, you can easily keep track of the IP numbers for a few machines.
Don’t use a DHCP server to assign TCP/IP information for your Client computers if you are going to use the “free” 2.1d version of Wingate. See this page for more info on using a DHCP server.
Use 192.168.0.1 as the IP address for the second NIC in the Sharing server. The first sharing Client computer should be assigned IP 192.168.0.2. If you don’t like those numbers or have more computers, then feel free to use any numbers between 192.168.0.1 and 192.168.0.254. Just remember that each machine must have its own unique IP address. (If you want to know why we’re using these IP addresses or want to know what the other alternatives are, read this page.)
In general, don’t change the settings for the NIC that is connected to your cable modem. You should only have to touch the settings for the second NIC, i.e. the one connected to your LAN.
IMPORTANT! Pay attention to Client computer TCP/IP setup instructions that come with the sharing program that you use. Different programs require different Client computer TCP/IP settings.
 If your Client is a laptop and you have to move it between multiple locations, the easiest thing to do is set up TCP/IP to obtain an address automatically (or use a DHCP server). See this page for more info on using a DHCP server. If either of the locations where you use your laptop doesn’t use a DHCP server, then you’ll have to switch TCP/IP settings when you move between locations. Check this page for suggestions on how to handle this.
If you have a MacOS computer, go here for info on configuring the TCP/IP control panel. If you try to follow the instructions below, you may not be able to successfully ping all machines.
Check for TCP/IP
In many cases, installing your Network Adapter will also install the TCP/IP protocol that your computer needs to communicate with the Internet. You can quickly check to see if it’s installed by opening your Network Control panel. You should see something like the highlighted entry in the picture below
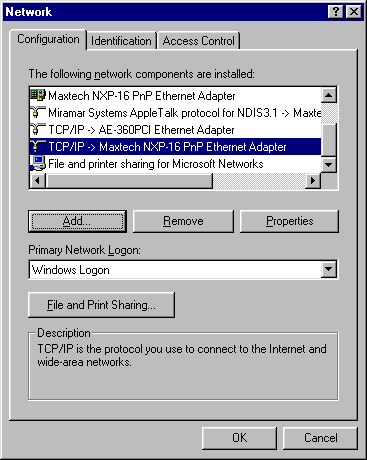
The highlighted entry means that the TCP/IP protocol has been installed and “bound” to the Maxtech Ethernet adapter. (“Bound” means that the hardware adapter and software protocol have been connected so that they work together.) If you see an entry like this (the name of your Ethernet adapter may be different than this example) in your Network Control Panel, you’re probably ok and you can skip down to enter information into the TCP/IP properties. Otherwise, you’ll need to install it, so read on!
Install TCP/IP
Installing TCP/IP is straightforward. On a Mac, it’s installed as part of Open Transport, so you can skip this section. On a Windows machine, go find your Windows installation CD, put it in the CDROM drive, then do the following:
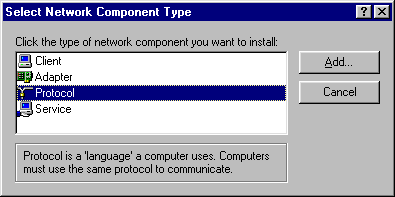
1. Open the Network Control Panel and click the Add button.
2. Select Protocol (as shown below) and click the Add button.
3. Select Microsoft and TCP/IP as shown below
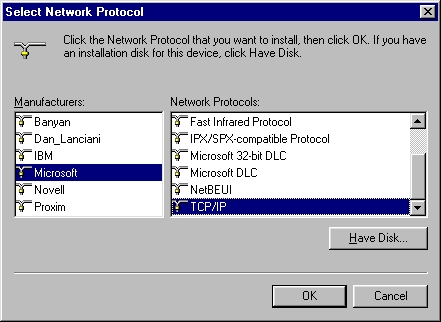
4. Click OK to close each open Network properties window. Windows will load the files it needs then ask to reboot. Let it reboot. After the computer reboots, you’re ready to configure the TCP/IP settings.
TCP/IP Settings for the second (LAN) NIC in the Sharing Computer
Enter the following information into your TCP/IP Control panel for the second NIC in your Sharing computer:
IP address: set to 192.168.0.1
Subnet Mask: 255.255.255.0
WINS Configuration: Disable WINS resolution
Gateway: Make sure there are NO entries.
DNS Configuration: Leave this alone
DNS settings apply to all NICs in a given computer, so you can’t set them differently for the LAN NIC.
If your ISP has assigned you a static IP address, this will probably be enabled and other information will be filled in when the first NIC was set up.
If your ISP uses DHCP to assign you an IP address, then this will probably be disabled because the DHCP server takes care of giving your computer the DNS and Gateway server information it needs.At any rate, don’t change the DNS setting.
Bindings: Check Client for Microsoft Networks and File and Printer Sharing for Microsoft Networks if you don’t have any other protocol (NetBeui, IPX/SPX) installed and bound to these items. Otherwise uncheck both these items so that you do not have either item bound to TCP/IP.
Advanced: make sure the “Set this protocol to be the default protocol.” is checked.
- NetBios: no changes.
TCP/IP Settings for the NIC in the Client Computer
You may need to change the following settings once you install Sharing, but they’ll get you started so that you can test your network:
IP address: set to 192.168.0.2 through 192.168.0.254.
Each computer needs to have a different IP address.Subnet Mask: 255.255.255.0
WINS Configuration: Disable WINS resolution
Gateway: set to 192.168.0.1
DNS Configuration: set to Disabled
Bindings: Check Client for Microsoft Networks and File and Printer Sharing for Microsoft Networks if you don’t have any other protocol (NetBeui, IPX/SPX) installed and bound to these items. Otherwise uncheck both these items so that you do not have either item bound to TCP/IP.
Advanced: make sure the “Set this protocol to be the default protocol.” is checked.
- NetBios: no changes.
That should be it for TCP/IP installation.


