
Do you want to install a home Ethernet wiring system, but don’t know where to start?
Don’t worry – this comprehensive guide will show you everything you need to know!
We’ll cover the basics of Ethernet wiring, and then provide detailed instructions on how to set up your system.
Although wireless networks and mesh systems are getting better every year, nothing beats a hard-wired network connection.
Nothing compares to the speed, latency, and stability of a wired ethernet connection in your home.
The only disadvantage of wired ethernet connections is that you’ll need to run the wires through your property, usually via the walls. This can be a little difficult if you are not remodeling your house.
Whether you’re a beginner or a pro, we’ve got you covered.
Let’s get started!
How to plan out your home network wiring
You should always begin a project with a plan. We not only need to know where we want our wired ethernet connections but also how to get to them once they’ve been installed.
I’ve split up the process into a few stages:
Make a basic floor plan for your home
This is beneficial in visualizing all of the network connections. You don’t need expensive CAD software for this I’ve done this with just a notebook and tape measure.
Where do you want the ethernet ports to go?
Think about where you want the ethernet connections and mark them on the plans. At this point think about where you might want to place any wireless access points. Contemplate the future too, your children may one day want a PC or games console in their bedroom or you may want to convert a spare room into a home office.
Related: Home Networking Diagrams
Where should the router and switches be placed?
Is it going to be more convenient to have a switch on each floor or can you manage with just one switch in one location?
What’s the most convenient way for you to install the wire?
Running cables through your house via the attic or crawl space is a good idea.
How many ethernet ports will you need?
We recommend at least two ethernet ports for each location. It will be cheaper and easier to install the extra points now than in the future.
Best Ethernet Cable for your Home Network
After we’ve finished our planning, we’ll look at what else we’ll require.
Of course, the ethernet cable is at the top of everyone’s list. Ethernet cables are classified in terms (Cat). The categories determine how quickly data can be transferred along the cables.
When selecting a cable for your home ethernet wiring, not only is the speed essential, but also the quality. Avoid purchasing CCA (Copper Clad Aluminium) cables since they are insufficiently durable.
It’s important to have a low resistance to get the best performance and speed from a UTP cable.
Only full bare copper cables can provide such low resistance.
Although you should not utilize PoE with CCA cables, this isn’t an issue because the cable resistance is too high.
The wires will become hotter and provide less power to the equipment over longer distances, due to the greater resistance. Another disadvantage of CCA cables is that they are brittle and inflexible.
This can lead to wires breaking, which can be a real pain to fix.
Cat 6 vs Cat 6a
Today, Cat 6 UTP cables are the bare minimum required in installations. There is a lot of uncertainty about the distinction between Cat 6 and Cat 6a these days. The latter is more expensive, around 2 times as much, but is it worth it?
Cat 6 cables are made with copper and have a maximum speed of 10 Gbps. Cat 6a cables are made with copper and have a maximum speed of 10 Gbps. They also have a higher bandwidth, which allows for more data to be transferred at once.
Which one should you choose? When it comes to home use, Cat 6 is usually more than enough. Because the cable lengths won’t go much past 37 meters, you’ll get 10 Gbps.
Your home network will be fine with the 250 Mhz of bandwidth.
Solid vs Stranded
A solid UTP Cable has one single wire for each conductor. There are eight conductors in a UTP cable, so a solid UTP cable is made up of eight solid wires. Stranded UTP Cables have wires that are composed of numerous wires wrapped around each other, making the cables more flexible.
You should use solid UTP cables for your home network wiring since they can simply be punched into the wall jacks and patch panels. Stranded wires are only utilized to make patch connections between your switch and patch panel using short cables.
Another advantage of using solid UTP wire is that you can easily get them in bulk starting at 250 ft and increasing up to 1000 ft.
Plenum Cat6 cables
Your home’s ethernet wiring may be run through your HVAC ducts or any other air circulation ducts. However, you’ll need Cat6 plenum cables with a special jacket to do so. These Cat6 cables have a fabric jacket that prevents fire spread up to 5 feet away.
Make sure you double-check your local fire and building regulations to see if there are any restrictions on the wires you can utilize in your HVAC ducts. Plenum cables are much more expensive than regular Cat6 cables.
Best Ethernet Cables
I recommend using a 23AWG cable. A 23AWG cable copper wires are thicker, which is preferable when utilizing Power over Ethernet.
The width of the wires in a 23AWG cable is 0.57mm, whereas those in a 24AG cable are only 0.52mm wide.
Patch Panel for Home Network
You can connect an RJ45 jack to a solid UTP cable, but it’s not recommended.
Ethernet cables that are hanging loose don’t look great, are difficult to work with, and locating the correct one is more difficult. But even more significant, UTP cabling with solid wires is brittle and should never be bent too much.
The stranded wire should be used on patch cables that connect your patch panel to your switch since these wires are flexible and more prone to bending (without breaking the wires).
A patch panel, on the other hand, is a far superior option. These patch panels don’t have to be huge and needn’t be installed in a rack all of the time. In addition, there are wall-mounted patch panels that are considerably smaller than those that would be used in a home network.
There are a few alternatives on the market. It’s all about how many connections you have, so it’s really difficult to say which is the best option. I like using wall-mounted patch panels for up to 12 ethernet connections. If you need more than 12 ports, you could use two of these or a 24-port patch panel.
Ethernet Wall Sockets
You’ll want keystone jacks that you can punch down for the other end of the ethernet cables. The wall sockets are different in America than they are in Europe.
In the United States, wall sockets with detachable keystone connections are available. This will make installation a lot easier.
Surface Mounted Ethernet Sockets
You can’t always rely on a wall socket for your ethernet connection. For example, you may want to use a surface-mounted socket with your access point.
You may integrate these into an ideal location and then connect the socket to the access point using a normal patch cable.
Using RJ45 plugs on a Solid UTP cable
Solid UTP cabling isn’t designed to crimp an RJ45 plug-on. However, it is possible. The key difference between solid copper and stranded copper lies in the RJ45 connector’s blades.
Tools you need for home ethernet wiring
We got all our network products, but you will also need some specialized tools to start with your home ethernet wiring:
- Punch down tool
- Wire cutting tool
- Network cable tester
- Drill
- Screwdriver
- Measuring tape
Running the cables
We can start by running the cables with all of our tools and parts. You’re usually connecting two or more ethernet cables to the same place. The length of the required cable may be measured, but it’s difficult to get right.
I prefer to run one ethernet cable, cut it, pull it back, and use that measurement to cut my second cable. I will then run both wires together.
On the wall socket side, make sure you have enough extra length in case something goes wrong with the connection, having some additional length on the wall socket side is useful.
Ethernet Cable Color Order
After you’ve removed all of the cables, connect to RJ45 jacks (if using them) and keystone jacks. There are two color standards on the keystone jacks and patch panel: 568A and 568B.
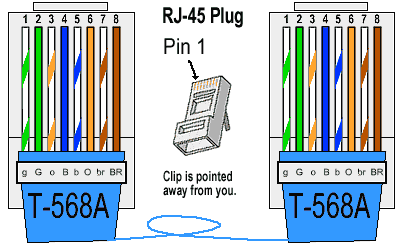
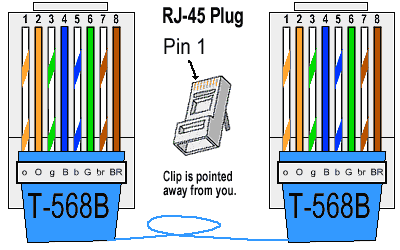
568B is the most popular standard in the United States and Europe. In Asia, 568A is more common.
568B wire colors are as follows:
- Orange/White
- Orange
- Green/White
- Blue
- Blue/White
- Green
- Brown/White
- Brown
Connecting RJ45 Plugs
It’s not difficult to connect RJ45 connectors, but if you take your time it pays off. Just make sure the cable is stripped 5cm / 2 inches away from the connector. This will make laying the wires in the correct sequence a lot easier.
This video explains how to connect RJ45 plugs:
Connecting keystone jacks
Punch-down keystone jacks are quite straightforward to set up. They have a color code on them that shows where the wire should be inserted. Simply lay the cable over the correct conductor with the punch-down tool and it will connect.
The video below explains it well:
Testing your Home Ethernet Wiring
After you’ve attached all of the ethernet cables, it’s time to put them to the test.
There are two methods for testing a cable: using a cable tester (the best method) or with a network device (notebook and switch).
The simplest solution, you may think, is to connect your laptop to one end and direct the other into a switch. If you have access to the internet, the cable is fine. Well not quite.
Ethernet cables have a problem in that they work if only four wires are connected correctly.
Cables testers
A cable tester will show you if all eight wires are connected correctly. This is important because it can help you to avoid potential network problems in the future.
Each wire is identified by a light on the cable tester. If the light does not glow, you have a faulty connection. The best option is to cut off the keystone jacket or RJ45 plug and start again.
Conclusion
I hope this guide to home ethernet wiring has been helpful. If you have any questions, please leave a comment below and I will do my best to answer them.
Happy networking!

