
Set Up Your Own VPN, Without the Expensive Software
By Eric Geier
If you want secure access to your network when away from the office, you can setup a Virtual Private Network (VPN ). You can connect via the Internet and securely access your shared files and resources. You don’t have to buy an expensive VPN server if don’t have a lot of users. Windows actually provides VPN server and client functionality.
In this tutorial, we’ll set up the Windows 7 or Vista VPN server and connect with Windows XP, Vista, or 7. Now let’s get started!
Avoiding IP conflicts
Since VPN connections link networks together, you must be careful with the subnet and IP addressing so there aren’t any conflicts. On the network hosting the VPN server, you should use an uncommon default IP for the router, such as 192.168.50.1. If you have multiple offices, assign each to a different uncommon IP/subnet, such as 192.168.51.1, 192.168.52.1, and so on.
Create an incoming VPN connection in Windows
To configure the Windows VPN server, you do what is described by Microsoft as “creating an incoming connection.” This will be the server or host of the VPN. Among other things, you’ll specify the users you want to be able to connect. Follow these steps to create an incoming connection:
- Right-click the network icon in the system tray and select Open Network and Sharing Center.
- Click on Manage network connections (Windows Vista) or Change adapter settings (Windows 7).
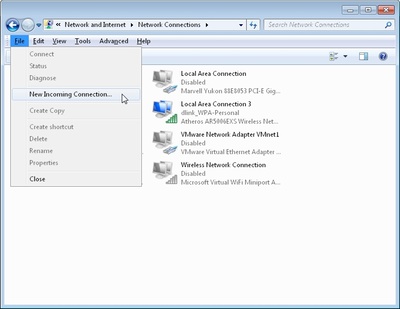
- Press the Alt key to show the File Menu and click File > New Incoming connection… .
- Select who you’d like to give VPN access to and/or create custom accounts by clicking on Add someone. See Figure 2 for an example. When you’re done, click on Next.
- Select Through the Internet, as Figure 3 shows, and click Next.
- Such as shown in Figure 4, select the protocols you want to enable for this connection. You’ll likely want to select Internet Protocol Version 4 (TCP/IPv4), so remote users receive an IP address and can access the Internet and/or network. Plus if you want the remote user(s) to access file and/or printer shares, select File and Printer Sharing for Microsoft Networks. When you’re done, click Allow access.
- On the next window, click Close.
Now you need to access the properties of the newly created incoming network connection and define the IP address range for VPN clients:
- On the Network Connections window, double-click Incoming Connections.
- Select the Networking tab and double-click Internet Protocol Version 4 (TCP/IPv4).
- Select Specify IP addresses and then enter a starting and ending address that’s within range of your local subnet but not conflicting with the DHCP range. For example, if your router’s IP is 192.168.50.1, you might enter 192.168.50.50 to 192.168.50.59 as shown in Figure 5, which would support 10 clients. If you want clients to be able to assign themselves an IP, select that option.
- Click OK on both dialog boxes to save the changes.
Configure any third-party firewalls
Windows will automatically allow the VPN connections through Windows Firewall when you configure the incoming connection on the host PC. However, if you have a third-party firewall installed on the host PC, you need to make sure the VPN traffic is allowed. You may have to manually enter the port numbers 47 and 1723.
Configure your IP address, dynamic DNS, and router
To enable VPN connections to the host PC from the Internet, you must configure your router to forward them to the Windows PC that’s accepting the incoming connections. You specify the host PC by entering its local IP address. Therefore, before you setup the port forward, you should ensure the IP address won’t change.
Start by logging into to the Web-based control panel of the router. Then go to the Network or DHCP settings and see if you can reserve the IP address for the PC so it always gets the same one. This may be called DHCP reservation or Static DHCP. Some routers don’t have this feature. In this case, you’ll need to manually assign the PC a static IP in the TCP/IP settings of the network connection in Windows.
Once you have figured out the IP address, find the virtual server or port forwarding settings in the router’s web-based control panel. Then create an entry forwarding port 1723 to the local IP address of the PC, such as Figure 6 shows. Don’t forget to save the changes!
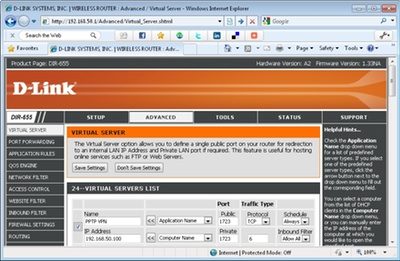
Figure 6.
If your Internet connection uses a dynamic IP address, rather than a static one, you should signup and configure a dynamic DNS service. This is because when you configure the remote clients, you have to input the Internet IP address of where the host PC is located. This will be a problem if the IP changes. However, you can sign up for a free service, such as from No-IP, and input your account details into the router so it will update the hostname with your IP. Then you’ll have a hostname (such as yourname.no-ip.org) to input into remote clients, which will always point to the current Internet IP address of your host PC.
Now everything on the server side should be configured and ready to go. Next you need to setup the clients.
Create outgoing VPN connections in Windows
Now that you have the server setup, you need to configure the computers which you want to connect from, called the VPN clients. Here’s how to in Windows Vista and 7:
- Right-click the network icon in the system tray and select Open Network and Sharing Center.
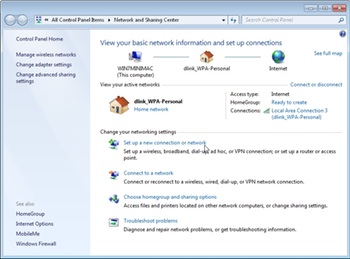
- Click Set up a connection or network (Windows Vista) or Set up a new connection or network (Windows 7, as shown below).
- On the wizard, select Connect to a workplace, and click Next.
- Select Use my internet connection (VPN).
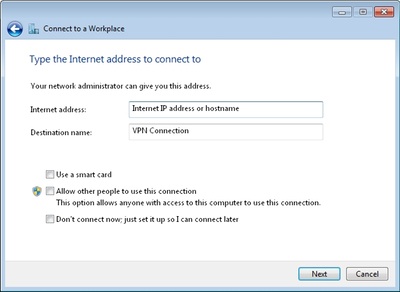
- Type the Internet IP address or hostname into the Internet address and enter something for the Destination name. See Figure 8 below for an example. You’ll probably want to keep the other options disabled.
- Click Next to continue.
- Enter a User name and password that was selected when you created the incoming VPN connection, and click Next to try to connect. It will attempt to connect using the following protocols: SSTP, PPTP, and then L2TP.
- Once connected, click Close.
Windows may by default assign the connection as a Public Network, limiting sharing functionality. Therefore you probably want to change this. If you aren’t prompted to do so, open the Network and Sharing Center and click Customize (Windows Vista) or the Public network link under the connection name (Windows 7). Then on the popup window, select Work Network.
Here’s how to create and outgoing VPN connection in Windows XP:
- Open the Network Connections window and click Create a new connection.
- Select Connect to the network at my workplace, and click Next.
- Select Virtual Private Network connection, and click Next.
- Enter a name for the connection, and click Next.
- Select Do not dial the initial connection, and click Next.
- Type the Internet IP address or hostname, and click Next.
- Click Finish.
Limiting VPN traffic
By default, all the Internet traffic on the VPN client will pass through the VPN rather than the local Internet they are connected to. This is great if they are using a public connection, like a port in a hotel or Wi-Fi hotspot, since it keeps their browsing private. However, if they are on a trusted network, like at their home or remote office, this just might be wasting bandwidth. To limit the traffic that passes through the VPN connection:
- On the Network Connections window, right-click the VPN connection and select Properties.
- Select the Network tab and double-click Internet Protocol (TCP/IP).
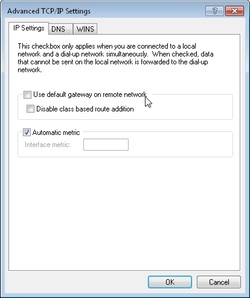
- Click the Advanced button and uncheck Use default gateway on remote network (see Figure 9).
- Click OK on the dialog boxes to save changes.
Now the VPN client will use the local Internet connection when browsing websites. It will only use the VPN connection when a server or IP address isn’t reachable via the Internet, such as when accessing shares on the VPN host network.
Connecting to the VPN
In Windows XP, you can connect and disconnect by opening the Network Connections window and right-clicking the VPN connection. In Windows Vista, you can click the network icon in the system tray, click Connect to, and then select the connection. In Windows 7, click the network icon in the system tray and select the VPN connection.
After you connect, you should be able to access the shared resources on the VPN host network. Keep in mind; you may have to manually access shares (e.g. ip_address_of_computer or file://computer_name/) rather than browsing in My Network Places or Network.
")

