Normally, once a Ring device is setup, it’s good to go and needs very little interference to operate properly. Sometimes though, like any other technical device, there can be little niggles but usually these can be ironed out with some simple troubleshooting. On other occasions, and for a variety of reasons you might need to change the WiFi network that your Ring device operates on.
In most cases, this is a straightforward process. In others, it can be a bit of a faff, involving dismounting the device to find and press a button. I’m going to take you through the process for each scenario on how to change WiFi on Ring doorbells and Cameras. Let’s get started.
Why Change Your WiFi Network On A Ring Device?
Moving Home: Moving homes often means new ISP which means setting up all your devices again. Your Ring device needs to be setup to work with your new WiFi to keep you protected.
New WiFi or Router Upgrade: Changing internet provider, or upgrading a router will require you to set up the new network on all your devices, Ring included.
Security Concerns: Upgrading security protocols, your SSID or changing passwords can cause your Ring devices to disconnect. You will need to enter the new network info and credentials to reconnect your device.
Network Issues: If your main network goes down due to an unscheduled outage, or for maintenance, switching your Ring to a backup network can ensure uninterrupted service. The most common method for doing this in a home, is to connect to a mobile Hotspot. As long as you are home, these can be set up temporarily to cover an outage, but you will need to connect to the hotspot and enter the password for to work.
Is the process the same for doorbells and cameras?
Generally, yes. Both devices use the Ring app as the primary tool for configuration, making the process quite uniform. There are variations depending on the model and the firmware that might change the options you see in the menu, or the colour of the setup button. Other than that, it is the same.
These steps do not work for the Ring Alarm however. For those devices, there is an entirely different process.
Methods To Change Wifi On Ring Doorbells Or Cameras
On all Ring doorbells and cameras, changing your WiFi network will require the Ring App. For some, all you need is the app, but in most cases you will also either need access to the ‘setup button’, or the ‘QR code’ that came in the box when you purchased the device. As all steps start with the app, this is where we will begin.
Using the Ring App:
- Open the Ring App: This is your gateway to all things Ring. Without the app you can’t control and configure your devices. Open the app and the dashboard will appear. If you can see the device you want to change from here in your dashboard, then go ahead and select it. If not, then click on the three horizontal lines at the top left of your screen. You might hear this icon referred to as the ‘hamburger menu‘.
- Select Your Device: From the menu drop down that appears, choose the ‘devices‘ option and then select the doorbell or camera that you wish to reconfigure.
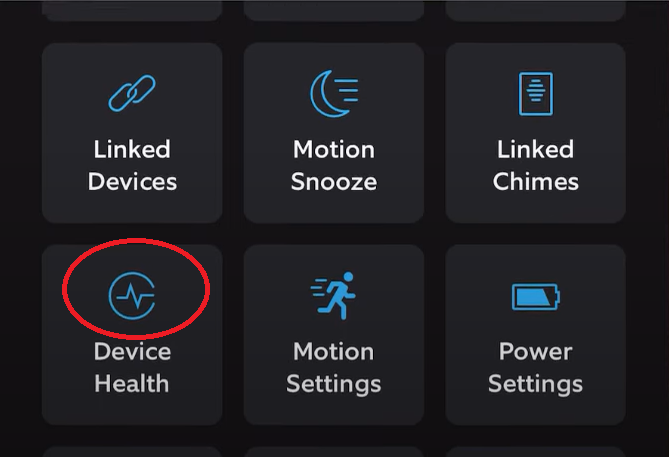
- Navigate to ‘Device Health’: From the menu that appears, select the option for ‘Device Health’. This section provides insights into your device’s connectivity and power status.
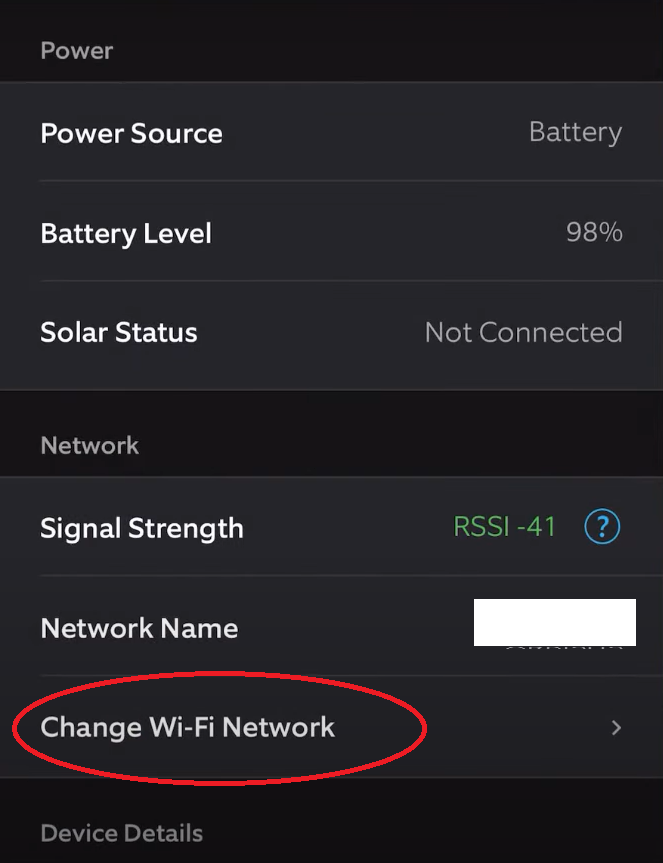
- Tap on ‘Change Wi-Fi Network’: When you select this option, you will get a pop up warning stating ‘please note: you will lose access to this device while it reconnects‘. Confirm your intention by pressing the ‘Change Wi-Fi Network’ button. This initiates the process. If you don’t see ‘Change WiFi Network‘, look for ‘Reconnect To WiFi‘. On some versions this menu is slightly different, but the function is the same.
Follow On-Screen Instructions: You next want to be standing next to your ring doorbell or camera with your smart phone and app still open. This is where things can go a few different ways. Your device will either:
- Start to flash with a blue light indicating it has entered setup mode (some cameras).
- On some cameras you might be given the option to chose between ‘movement‘ and ‘setup button‘. If you have the choice for ‘movement’ select this as it is much easier. You just need to be close to the camera and stand within it’s field of view and when it spots movement it will enter setup mode.
- You may be prompted to enter setup mode manually – this is the most common scenario and the most fiddly too.
- If you still have the box the device came in, and the QR code Barcode sticker for the device that you used when you first set it up, you can use this QR code to set up the device again from scratch.
How To Manually Enter Setup Mode on Ring Doorbells and Cameras
In most cases, once you set your intention to change your WiFi network on a Ring doorbell, you are going to need to enter setup mode to complete the process. It sounds simple, but it can be a bit of a pain.
You are going to need the screwdriver head that came in the box with your device, or a standard torque15 (T15) screwdriver to open any protective casing. You are going to need to either remove the device from the wall, or remove the face or side plate cover depending on your device.
Here is what you will need to access for each type of device:
Doorbells:
- Ring Video Doorbell (Original): Detach the doorbell from its mount (we go through this below) and give the orange button on the rear cover a quick press. No need to keep it pressed, as holding for too long will start a hard reset.

- Ring Doorbell Pro: Remove the faceplate for the doorbell. Then, give the button on the doorbell’s right-hand side a push. The button is usually orange but it may also be black.
- Ring Doorbell 2, 3, Plus, and Elite: As with the Pro, you need to remove the doorbell’s faceplate. Next, tap the black button located on the device’s front. This will start the setup process.
Cameras:
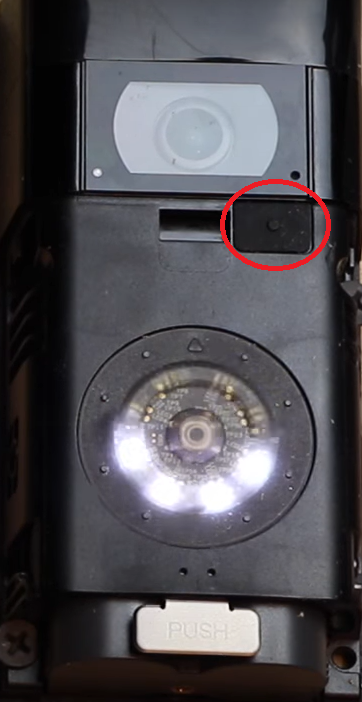
- Ring Stick Up Cam: For these cameras, you have to open the back cover. After opening the back cover, you’ll spot an orange button. Press it and the setup operation will begin.
- Most Ring Outdoor Cams (i.e.: Spotlight Cam): In most cases, you’ll find a setup button on top of the camera. Press the button but only for a second or two. Don’t keep it held in. If you do hold it in, this will hard reset the device.
- Ring Peephole Camera: With these cameras, the button is on the inside part of the door. As before, press it but don’t hold it.
Completing Setup Mode And Connecting To A New WiFi Network
Once you have entered Setup Mode, simply follow the continuing instructions in the Ring App on your smart phone.
- When prompted in the App to join a WiFi network, select ‘join‘. This is not the connection that you will choose in a few minutes, it is a temporary connection that the device uses to complete setup.
- As the device continues to setup, you will be prompted to ‘select the WiFi network‘ that you want Ring to connect to.
- Select the home network that you want to use and enter the security password.
- Setup should now complete with your Ring connected to your new WiFi network.
QR Code Method
- Locate the QR Code: This is usually found in the box your Ring device came in. It can also be found on the back or the base of your device.
- Scan During Setup: This code provides a quick way to reset and connect to a new WiFi network. Select ‘Set Up Device‘ from the Ring App main menu, choose your device and scan the code when prompted.
Which Frequency Band Does Ring Work On?
Most Ring devices are compatible with and best suited to the 2.4GHz frequency. Some advanced models, like the Ring Doorbell Pro and Elite, can work ok with the 5GHz frequency too. What’s the difference? Well 5GHz is faster and can move more data, but 2.4GHz is more reliable and stable, not as vulnerable to interference. That’s why most smart home devices and networks use 2.4GHz. They are low data and power and need stability.
You can read more about the differences between 2.4GHz and 5GHz here.
What If Ring Won’t Connect To WiFi – Troubleshooting steps
Restart Your Router: It’s the common solution to lots of little connection glitches, and offers a fresh start if your connection is hanging.
Check Frequency: If you have a basic Ring model, ensure it’s trying to connect to a 2.4GHz network and not 5GHz.
WiFi Channel: Some channels, especially 11-12, might give Ring devices a hard time. Stick to channels 1-10 for smoother performance.
If you need help with some of these steps, or if you need to troubleshoot further, check out our bigger guide on Ring Doorbells not connecting to WiFi.
If all else fails, you can always contact Ring support. They’re the experts. If you’ve tried everything, it might be time to give them a call.


