")
When it comes to internet connection difficulties, you are more likely than not to encounter one of two scenarios.
- Your computer says there is no network connection at all.
- There is a connection, but you can’t use the internet.
If you’re having trouble connecting to the internet via WiFi, you’ve probably seen an error alert that reads “WiFi connected but no internet.”
In this post, you’ll discover what the above error message indicates, what are the typical reasons for it, and of course how to fix it.
What does the “WiFi connected but no internet” error message mean?
The “WiFi connected but no internet” error message typically indicates that your computer is connected to the local network, but you are unable to connect to the internet.
Why do you see the WiFi connected but no internet error message?
On Windows PCs, the compact yellow caution triangle with a black exclamation mark is used to indicate that an app is experiencing an error. On Android and iPhone devices, a black exclamation mark replaces it.
It is accompanied by one of the following error messages:
- WiFi connected but no internet
- Connected, no internet access
- WiFi has no Internet Access
- No internet connection
These are some of the error messages you may receive if your computer is unable to connect to the internet.
If you see one of these messages while attempting to access the internet, it indicates that your device is linked to the local network (your router or modem), but something is preventing access to the internet.
There are several reasons why this might happen:
- Your computer’s WiFi adapter is faulty.
- Your internet service provider (ISP) is down.
- Your computer has an incorrect internet protocol (IP) address.
- Security software (Firewall/Antivirus) is preventing access.
- Your wireless drivers are out of date.
- Your DNS server settings are configured wrong.
- Your DNS cache has become corrupted.
- Your router is faulty.
- You have an outdated wireless device on your computer.
We must first identify if the problem is confined to a single device or if it affects the entire network.
Knowing this information will help you decide what actions to take to correct the problem.
Do you have no internet access only on one device or the entire network?
You must first determine if the “WiFi connected but no internet” problem is affecting one device or your whole local network to figure out which resolution steps are required.
This will help us narrow down the likely cause and then the correct method for solving your no internet access problem.
A single device has a WiFi connection without internet
If your PC or laptop is the only device on your network that claims to have a connection but no actual internet access, you likely have an incorrect configuration problem, faulty drivers, WiFi adapter, DNS problems, or an issue with your IP address.
To check this out try using another device such as your iPhone, iPad, or Android device to connect to the internet.
All devices have a WiFi connection but no internet
If all of your devices on the network have a WiFi connection but they do not have access to the web, your router or modem is most likely faulty. Alternatively, your internet service provider may be down.
In the sections below, we’ll categorize solutions according to whether the problem is confined to a single computer or if it affects the entire network.
How to Fix the “WiFi Connected But No Internet” error message
If you’re getting this message on a single device, follow the procedures below. If it appears that your network is at fault, continue with the instructions in the next section.
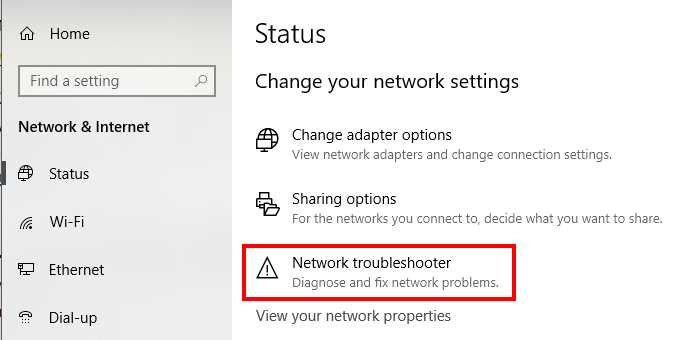
1. Use the Windows Network Troubleshooter
Using the built-in Windows Network Troubleshooter is one of the first things to try. It has evolved into a powerful tool for resolving network connection difficulties, and it may be able to fix your problem immediately.
To run the network troubleshooter:
- Open Settings.
- Click on Update & Security.
- Click on Troubleshoot.
- Under the “Recommended troubleshooting” section, click the Additional troubleshooter’s option. …
- Under the “Get up and running” section, select the Internet Connections troubleshooter.
2. Disable VPNs
Virtual Private Networks (VPNs) are excellent ways to increase your internet security. They can also assist you in appearing to be from another country when using services that have geographical differences.
VPNs also add an extra step when you connect to the internet, and if your VPN provider has a technical problem or outage, you may receive a connected but no internet access error message.
If you’re still having trouble after following all of the above, consider removing your VPN.
Here’s how to turn off a Windows VPN:
- Open the program by typing “Settings” into the Windows search bar.
- On the screen that appears, click on Network & Internet.
- Select VPN from the menu on the left.
- Disconnect your VPN connection by selecting it and hitting the Disconnect button.
- Check to see whether you can connect to the internet
Even if disabling the VPN did not fix your no internet access but WiFi connected problem, do not re-enable it yet. Before you start adding back any component that interacts with your internet connection, you’ll want to find the source of the trouble.
Keep your VPN turned off, and move on to the next step.
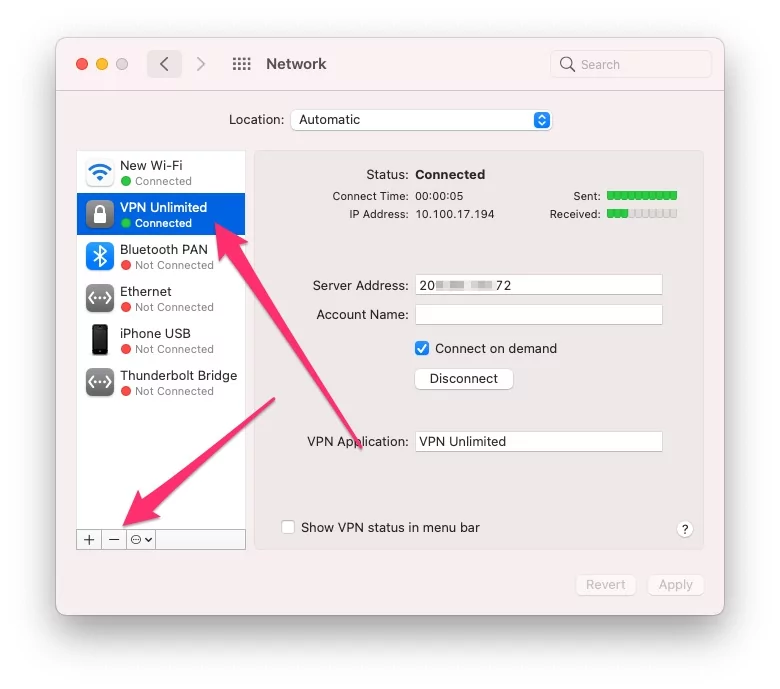
Here is how to disable a VPN on macOS:
- Open System Preferences.
- Click on the Network icon.
- Select VPN from the menu on the left.
- Choose the desired VPN connection and click on the “-” sign to remove it.
- Check to see if you can connect to the internet.
3. Disable proxy
A proxy server is a computer that sits between your device and the internet and helps route traffic.
When you’re using a proxy server, your web traffic goes through the proxy instead of directly to the website. This can be useful for a variety of reasons, such as hiding your location or encrypting your traffic.
All of your network traffic must pass through a proxy server, if it fails, you may experience a range of connection problems ranging from slowdowns to no access to the web at all.
If you have a proxy server configured in Windows, disable it to rule out proxy as a potential source of the problem.
- Type “Settings” in the Windows search bar and open the app.
- In the new window that opens, click on Network & Internet.
- Select Proxy from the menu on the left.
- Scroll down to the Manual proxy setup section, and make sure that the Use a proxy server toggle is off.
4. Check time synchronization
Opening a website in your browser may appear to be straightforward, but it’s quite complicated. For it to happen, your computer and other internet systems must go through a lengthy series of actions. The order of procedures is maintained by the use of timestamps throughout each interaction between your computer and the internet.
If the clock on your computer differs from the server it is trying to contact this can cause problems.
Here is how to set your time to automatic on Windows:
- Right-click on the clock that’s located at the bottom right of the taskbar.
- From the menu that opens, select Adjust date/time.
- Ensure that the Set the time automatically is ON, and the Set the time zone automatically is ON as well.
- Click on the Sync now button.
- Check if you have internet access now.
Here is how to set the date and time automatically on an Android smartphone:
- Open your Settings app.
- Select the System option from the list that shows up.
- Next, click on Date & time on the System screen.
- Make sure that the Automatic date & time option is ON, and that the Automatic time zone is ON as well.
Here is how to set the date and time automatically on iOS:
- Open the Settings app on your iPhone.
- Tap on General.
- Select Date & Time.
- Toggle on Set Automatically.
5. Disable Fast Startup
This might be interfering with your connection if you utilize the Fast Startup function to turn off and start up your computer faster.
Do the following steps to turn it off:
- Press Win + R to open Run.
- Type control and click OK to open the Control Panel.
- Go to System and Security and then click on Power Options.
- In the left pane, click on Choose what the power buttons do.
- Next, click the Change settings that are currently unavailable link.
- Under the Shutdown settings section, check the Turn on fast startup (recommended) option to turn on the feature.
- Uncheck the Turn on fast startup option to turn it off.
- Click Save changes to apply the changes.
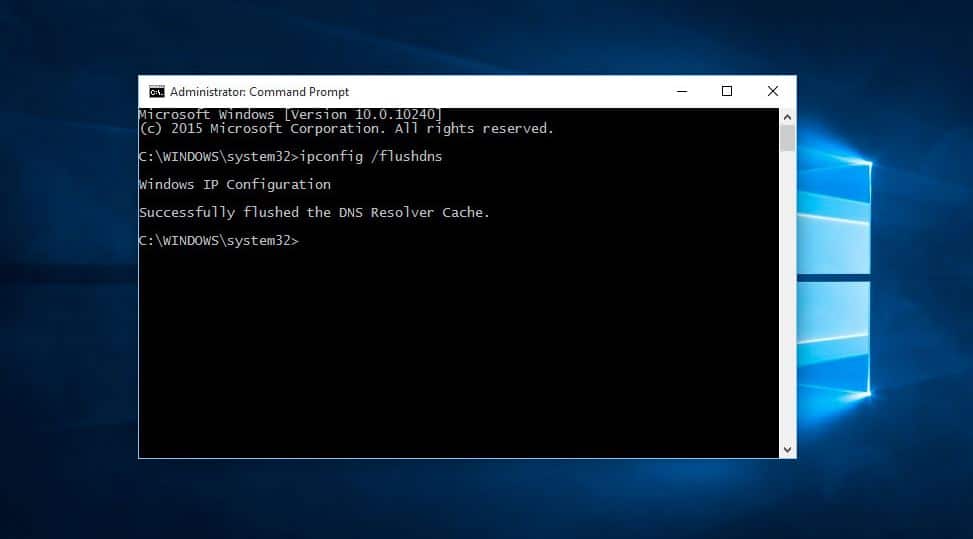
6. Flush your Domain Name System (DNS) cache
If your DNS cache becomes corrupted, either by malicious code or by technical glitches, it can cause a mismatch in your IP address.
This will prevent you from connecting to the internet even if there is a WiFi connection.
To flush your DNS on Windows, follow these steps.
- Run the Command Prompt.
- Now type in the following commands and hit Enter after each one:
- ipconfig /flushdns
- ipconfig /release
- ipconfig /renew
- Once this is done, close the Command Prompt window and see if you have an internet connection.
How to Flush DNS on macOS
- Open the terminal by using Spotlight Search or by pressing Command + Space and then type Terminal.
- Double click the application icon for Terminal to open it.
- Type in “sudo dscacheutil -flushcache;sudo killall -HUP mDNSResponder” without quotes
- Enter your Mac’s password
- Press Enter to complete
7. Update your network adapter driver
If you don’t keep your computer up to date but do not maintain the corresponding hardware drivers, you might encounter a communication problem as a result of an out-of-date network adapter driver.
For this step, you will need to connect your PC or Laptop to an Ethernet Connection.
To update your WiFi driver, do the following.
- In your computer’s search bar, type in “device manager” and open the result.
- Find “Network adapters” in the list and expand the section.
- Find your WiFi adapter in the expanded list and right-click it.
- Choose the Update driver option.
If your computer does not automatically update the driver to the newest version, you may need to install it manually.
8. Check your IP address validity
Your computer’s IP address may be incorrect, which prevents it from getting online. A static IP address in Windows settings is a typical reason for an invalid IP.
Windows should automatically get an IP address and a DNS server address from your router or modem. Unless you have a specific reason to set your IP address to a different value, this is the best way to go.
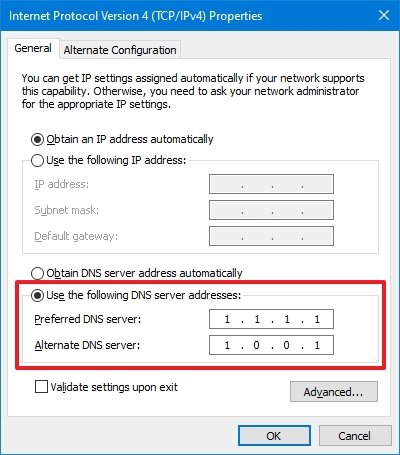
9. Change your DNS server address
While the default DNS server settings usually work well, it’s possible that the assigned DNS server is currently down.
When a DNS outage occurs, your WiFi adapter can still connect to your router or modem, although you will have no internet access because there is no functional DNS server.
You can alter the DNS server address in Windows to a public DNS service like OpenDNS, Google, or Cloudflare to eliminate this root cause.
1. Open Control Panel.
2. Click on Network and Internet.
3. Click on View network status and tasks.
4. In the left pane, click Change adapter settings.
5. Right-click your active network connection and select Properties.
6. Select Internet Protocol Version 4 (TCP/IPv4) and select properties
7. For Google DNS in DNS 1, enter 8.8.8.8 and for DNS 2, enter 8.8.4.4
8. Click OK to save your changes.
Try accessing the internet again to see if this has resolved your issue.
10. Reset your TCP/IP configuration using the Command Prompt
The “WiFi Connected but No Internet” problem can come from a variety of sources.
Resetting your computer’s TCP/IP configuration with the Command Prompt is another remedy:
- Press the Windows key + R on your keyboard.
- Type “cmd”
- Type the following commands and hit Enter after each line:
- netsh int ip reset
- netsh winsock reset
- ipconfig /release
- ipconfig /renew
Check if the no internet issue is resolved.
Related: Common Windows Network Commands
11. Turn off IPv6
If you’re having trouble connecting to the internet deactivating IPv6 on your computer might be a fast fix. Your computer would instead connect through IPv4 after performing this procedure.
Here’s how to disable IPv6 on Windows:
- Press the Windows key on your keyboard.
- Click on Settings.
- Choose Network & Internet.
- Scroll down and click Change adapter options.
- Right-click on your active network adapter and select Properties.
- In the Properties window, scroll down until you see Internet Protocol Version 6 (TCP/IPv6) and uncheck the box beside it.
- Click OK to save the changes.
To see if the fix worked, you may have to restart your computer.
12. Run a malware scan
Malicious applications on your computer might result in a variety of issues, such as no internet access. Regaining total control over your PC and data is just as essential as regaining internet access in this scenario.
When your computer behaves erratically, it’s a good idea to perform a comprehensive malware scan. Windows Defender is a strong built-in antivirus program included in modern Windows versions.
Here is how to run a full malware scan with Windows Defender:
- Type “Windows Security” in your Windows search bar and open the app.
- In the main area of the new window that opens, click on Virus & threat protection.
- On the new screen, select Scan options.
- Pick the Full scan option, then click the Scan now button.
If you’re using third-party antivirus software, use it to run a full scan.
Examine the results of the scan to determine whether any malware was detected and remove it from your computer, then try your internet connection.
13. Temporarily disable your firewall and antivirus
If your computer says that there is a WiFi connection in some cases, a firewall or antivirus software is the culprit. If you have third-party security software on your computer, try disabling it to see if the problem resolves itself.
You can also try to temporarily disable Windows Defender Firewall:
- Press the Windows key on your keyboard.
- Type “Control Panel” into the Windows search box and open the app
- Click System and Security.
- In the new window, choose Windows Defender Firewall.
- On the left side of the window, choose “Turn Windows Defender Firewall on or off“.
- Choose to turn off Windows Defender Firewall for the network that you are having trouble with.
Do the same with any other antivirus or firewall software that you have installed on your computer.
If you discover that you have internet access, then your security software likely has a restriction that prevents you from surfing the web.
It’s a good idea to keep your antivirus software up-to-date to prevent this.
How to resolve the “WiFi Connected But No Internet” across your entire network
1. Check if your Internet Service Provider (ISP) is down
If all of your devices have a connection to your wireless network, but you cannot access the internet, it may be due to an issue with your service provider.
The only way to check this is to either use cellular data to look up your internet service provider’s network through their website or social media pages or call your internet service provider.
In some cases, if you can use cellular data to get online, you can use other websites like DownDetector to see if the service is down or if others are reporting the same issue as you.
If your internet service provider is not experiencing an outage, your router is likely the source of the issue.
Move on to the next step below.
2. Remove any WiFi range extenders
The more complex your WiFi network, the more problems you will have with it. For example, WiFi repeaters and range extenders are notorious for introducing their own set of network stability and connection issues.
When you experience a network issue like WiFi-connected without internet, you should remove all additional components from your network, including switches, WiFi repeaters, range extenders, etc.
You should only test with your modem and router.
If you find that you have internet access when connecting directly to your primary WiFi router, then you can be sure that the issue is with one of the additional devices that you have just removed. Start adding back the extra components, and when your internet access drops again, you have found the faulty device.
It might just be a configuration issue, but you may have to replace that piece of hardware.
If you are connecting to your primary router and still don’t have internet, you will need to focus on your router next.
3. Power Cycle your modem and router
Just as it sounds, turning your router and modem off, then on again is a step anyone can try, and it does resolve many internet connection issues.
- If you only have a router, power it down, then unplug it from the wall. Then, after about 3 minutes, plug it back in and turn it on again.
- If you have a router and modem, power both off and unplug them. Plug the modem in first, after about 30 seconds, then wait another few minutes before powering on the router.
Once everything has finished powering up 5-10 minutes later, test your devices again to see if the issue is resolved.
4. Check MAC address filtering in your router settings
Media Access Control (MAC) addresses are unique identifiers that you can use to control network access for devices. Most routers come with a feature that allows filtering device access based on MAC addresses.
You need to check if this feature is enabled and if it is in allow or deny mode. The selected mode determines if the MAC addresses that are listed in your router – and ONLY those that are listed – can connect to the internet (allow mode), or if the listed devices are prevented from connecting (deny mode).
You can access your router’s management console from any web browser. You just need to know the correct IP address.
You can usually find the default IP address at the bottom of your router box. If you can’t find it there, here is how to retrieve it using the Command Prompt and then disable the MAC address filtering in your router:
- Press the Windows key and type “cmd” into the search field.
- Right-click the Command Prompt app and click Run as administrator.
- In the Command Prompt window, type the command “ipconfig” and press Enter.
- Look for your Default Gateway IP Address that will look something like: 192.168.X.X
- Type this IP address into your favorite web browser to open your router’s management console.
- Most likely, you will need to log in with your router’s credentials which are NOT the same as your WiFi username and password. These may be located on the back of your router or may simply be “admin” if you’ve never changed them before.
- Once you can access your router settings, make sure that the MAC address filtering feature is disabled or that you do not deny internet access to your device with a specific filtering rule.
5. Update your router firmware
Just as outdated network drivers, an out-of-date router firmware can also cause network issues. The exact actions needed to update a router firmware varies based on the router’s brand, but the general steps are listed below.
Warning: Updating hardware firmware always has some risks. Make sure that your router’s power supply is stable, and do not interrupt the update process at any point because that can completely break your device.
To update your router firmware:
- Check your router’s model type, which is typically written on the back of the box.
- Visit the router manufacturer’s website, search for the latest firmware version for your router model, and download it.
- Log in to the router’s management console as explained in the method above.
- Search for the Firmware update menu item. The exact location will vary based on the brand.
- Select the downloaded firmware file and start the update process.
- Let the process finish without interfering with your router in any way.
6. Check your mobile data when using a hotspot
This method applies to cases when you share WiFi to your computer from a mobile hotspot. Many users report a hotspot connected but no internet issue because while the WiFi hotspot may be enabled on their Android smartphone or iPhone and other devices can connect, their cellular or mobile data is probably turned off.
Reset your entire network
If you are still experiencing the WiFi connected without internet error after going through all of the methods above, you may need to reset your entire network.
A network reset will change your settings back to their default state and remove all network adapters as well. Unfortunately, you will need to set everything back up again, including updating default network adapters and reconnecting to your local network.
You will need your internet network’s password to do this.
To reset your network, follow these steps.
- Type in “settings” into your computer’s search bar.
- Click on the “network & internet” option.
- In the left-hand menu, click on the “status” option.
- Scroll down until you see the “network troubleshooter” section.
- Find “network reset” in the options.
- Click on “network reset” and follow the on-screen instructions.
Once the network has been reset, reconnect to the internet by clicking on your internet’s taskbar icon.
You may need to bring up a list of available networks, find yours, and connect to it.
Summary
Hopefully, one of the methods listed above has successfully solved your WiFi connection but no internet issue.
However, if you still have no internet access on your computer, your best bet is to contact a professional IT technician to further troubleshoot the problem.
Alternatively, you can check out our related articles on similar network connectivity issues.
")

")
")
)